This is the multi-page printable view of this section. Click here to print.
How-To guides
- 1: Portefaix Infrastructure
- 1.1: Amazon Web Services
- 1.1.1: Overview
- 1.1.2: Install on Amazon Web Services
- 1.2: Microsoft Azure
- 1.2.1: Overview
- 1.2.2: Install on Microsoft Azure
- 1.3: Google Cloud Platform
- 1.3.1: Overview
- 1.3.2: Install on Google Cloud Platform
- 1.4: Alicloud
- 1.4.1: Overview
- 1.4.2: Install on Alibaba Cloud
- 1.5: Scaleway
- 1.5.1: Overview
- 1.5.2: Install on Scaleway
- 1.6: Digital Ocean
- 1.6.1: Overview
- 1.6.2: Install on Digital Ocean
- 1.7: Exoscale
- 1.7.1: Overview
- 1.7.2: Install on Exoscale
- 1.8: Civo
- 1.8.1: Overview
- 1.8.2: Install on Civo
- 1.9: IBM Cloud
- 1.9.1: Install on IBM Cloud
- 1.9.2: Install on IBMCloud
- 1.10: Oracle Cloud Infrastructure
- 1.10.1: Install Portefaix
- 1.10.2: Overview
- 1.11: Homelab
- 1.11.1: Install Portefaix
- 1.11.2: Overview
- 2: Cloud Native Applications
1 - Portefaix Infrastructure
1.1 - Amazon Web Services
1.1.1 - Overview


1.1.2 - Install on Amazon Web Services
Setup
Creates an AWS Organization, and enable Service Control Policies in AWS organizations.
Now that we’ve created an organization, you’ll notice that all the policies are disabled by default.
There you need to enable AWS Service Control Policies in the AWS console by clicking on the button Enable service control policies. Do the same action for the AWS Tag Policies.
Navigate to Personal Health Dashboard service in the console. On the left side panel, expand Organizational view and choose configurations. Then, enable organizational view for AWS Health
Create an admin user, and configure account alias for IAM Users access
Then API Keys.
Configure Portefaix environment file ${HOME}/.config/portefaix/portefaix.sh:
HOME_IP=$(curl -s http://ifconfig.me)
SLACK_WEBHOOK_NOTIFS="https://hooks.slack.com/services/xxx/xxx"

# AWS
function setup_aws() {
    export AWS_ACCESS_KEY_ID="....."
    export AWS_SECRET_ACCESS_KEY="....."
    export AWS_DEFAULT_REGION="..."
    export AWS_REGION="...."
    # For Terraform Cloud
    export TF_VAR_access_key="${AWS_ACCESS_KEY_ID}"
    export TF_VAR_secret_key="${AWS_SECRET_ACCESS_KEY}"
    export TF_VAR_slack_webhook_url="${SLACK_WEBHOOK_NOTIFS}"
    export TF_VAR_org_email="xxxxxx"    # for Root Account
    export TF_VAR_org_email_domain="gmail.com"
    export TF_VAR_org_admin_username="xxxxxx"
    export TF_VAR_admin_ipv4="[\"${HOME_IP}/32\"]" # for WAF
}
Load environment :
❯ . ./portefaix.sh aws
Storage for Terraform
Create a S3 bucket for Terraform states:
❯ make -f hack/build/aws.mk aws-s3-bucket ENV=staging
Create a DynamoDB table :
❯ make -f hack/build/aws.mk aws-dynamodb-create-table ENV=staging
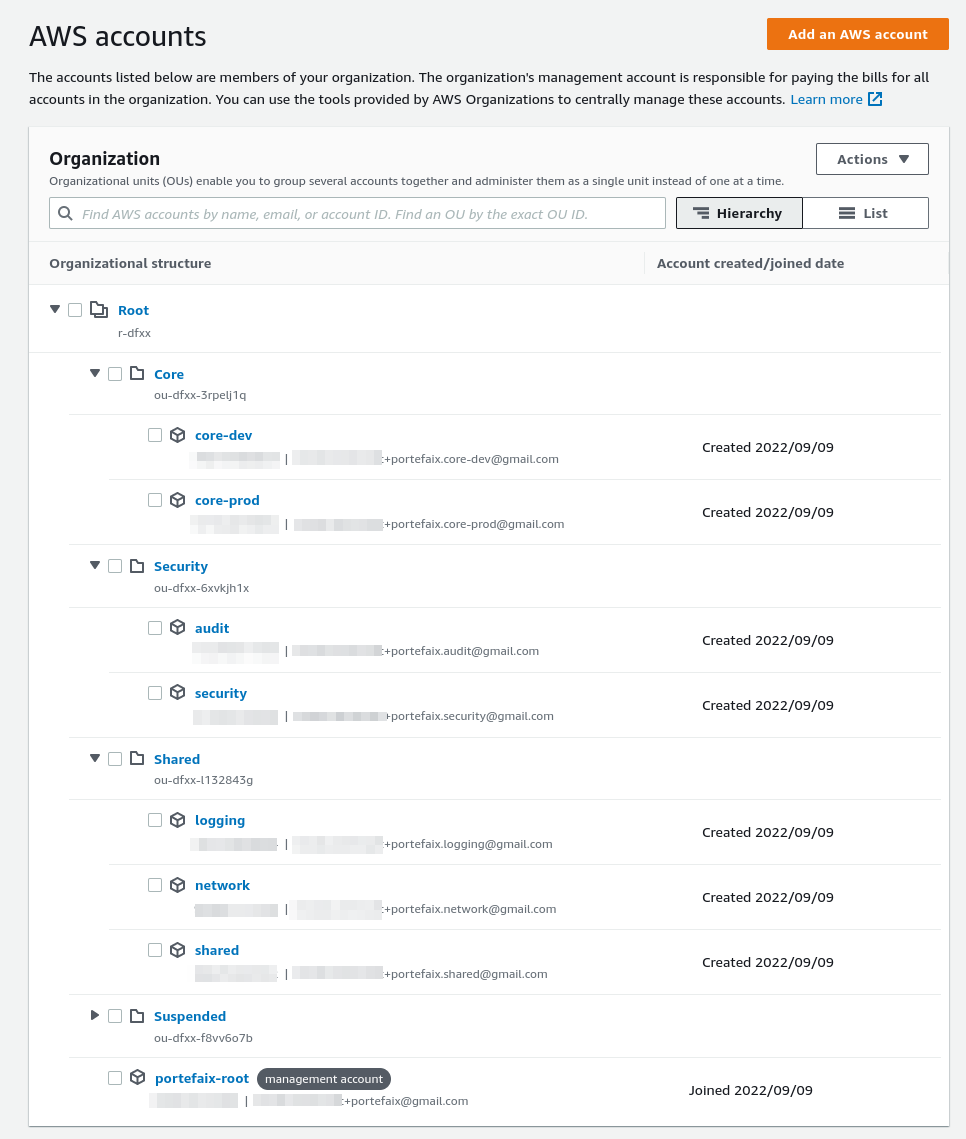
AWS Organization Units and Accounts
Configure the AWS Organization:
❯ make terraform-apply SERVICE=terraform/aws/root ENV=main
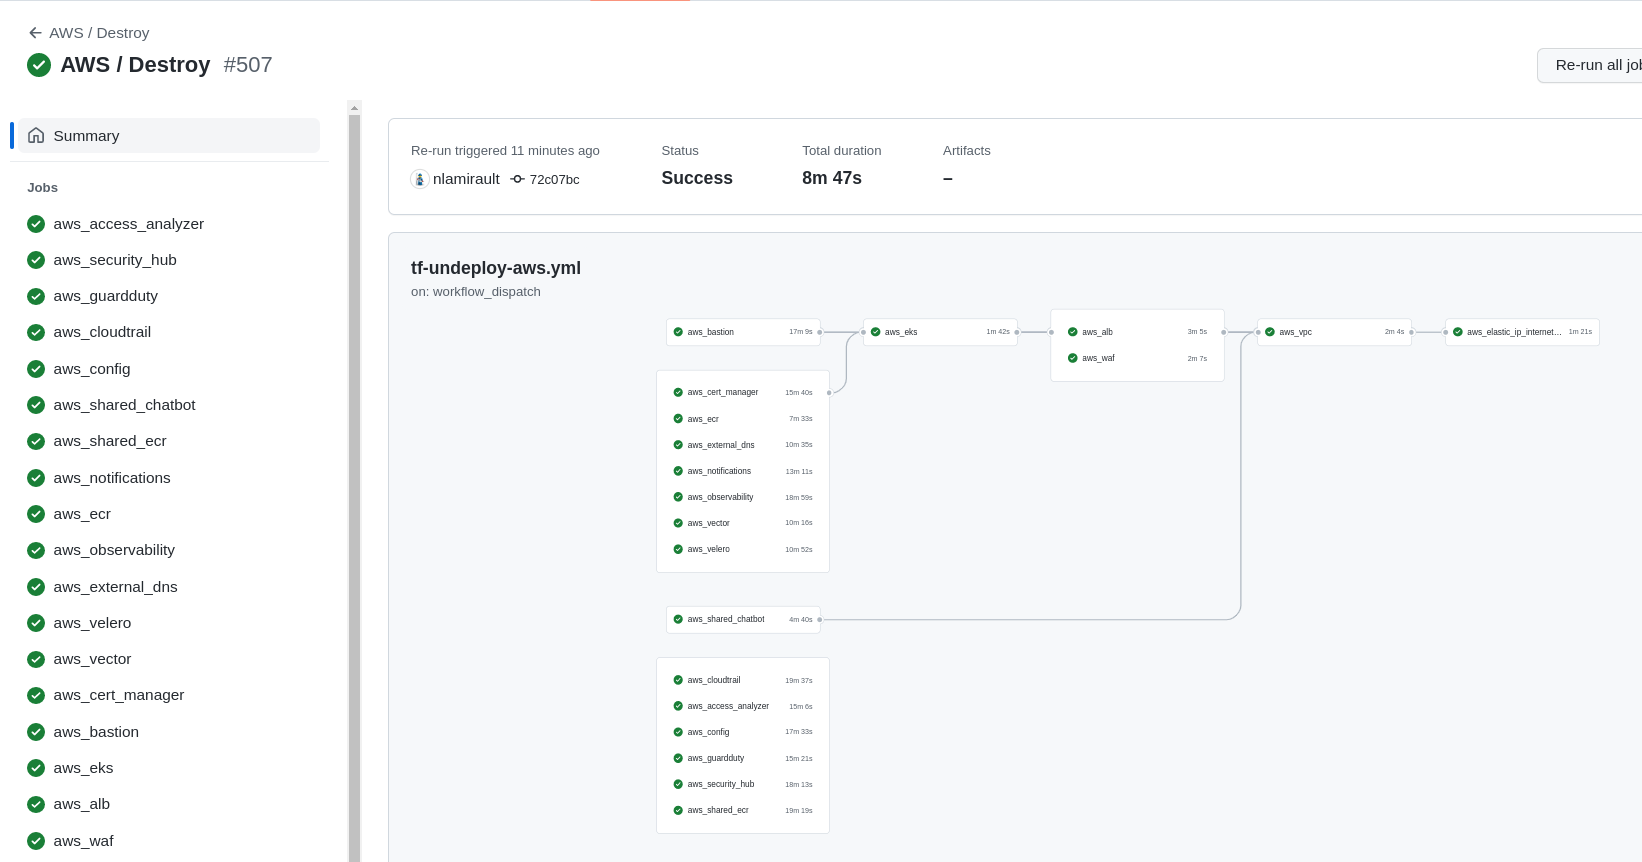
Terraform Cloud / Github Actions
- Terraform Cloud is used as the remote backend.
- Github Actions perform tasks to deploy or undeploy the AWS infrastructure.
❯ make terraform-apply SERVICE=terraform/aws/terraform-cloud ENV=main

Authentication
Kubernetes
Configure the AWS provider
❯ . ./portefaix.sh aws
[ Portefaix ]
Setup credentials
Done
Perform an AWS authentication:
❯ make -f hack/build/aws.mk ENV=staging aws-admin
source ./hack/scripts/aws-auth.sh xxxxxx Administrator portefaix-staging-eks eu-west-1

❯ source ./hack/scripts/aws-auth.sh xxxxxxx Administrator portefaix-staging-eks eu-west-1
Update Kubernetes configuration file:
❯ make -f hack/build/aws.mk ENV=staging aws-kube-credentials

❯ kubectl get nodes
NAME                                        STATUS   ROLES    AGE   VERSION
ip-10-0-13-85.eu-west-1.compute.internal    Ready    <none>   81m   v1.23.9-eks-ba74326
ip-10-0-29-115.eu-west-1.compute.internal   Ready    <none>   81m   v1.23.9-eks-ba74326
ip-10-0-60-137.eu-west-1.compute.internal   Ready    <none>   81m   v1.23.9-eks-ba74326
ip-10-0-70-76.eu-west-1.compute.internal    Ready    <none>   81m   v1.23.9-eks-ba74326
Bastion
You would use the AWS System Manager plugin to connect to EC2 and EKS instances:
❯ aws ec2 describe-instances --output table
-------------------
|DescribeInstances|
+-----------------+

❯ aws ssm start-session --target i-019042b3847f5c81f
Starting session with SessionId: portefaix-admin-031b2ba6d981142b0
Gitops for Kubernetes
Next: Gitops
Inspec
Inspec is used to check infrastructure.
Check:
❯ make -f hack/build/aws.mk inspec-debug
Test infrastructure

 ────────────────────────────── Platform Details ──────────────────────────────

Name:      aws
Families:  cloud, api
Release:   train-aws: v0.1.15, aws-sdk-core: v3.94.0
Execute tests:
❯ make -f hack/build/aws.mk inspec-test SERVICE=iac/aws/<SERVICE> ENV=staging
You could upload JSON results file to Heimdall Lite to display ressults
CIS AWS Foundations Benchmark
You could perform tests according to the CIS AWS Foundations Benchmark:
❯ make -f hack/build/aws.mk inspec-aws-cis ENV=staging
CIS Kubernetes Benchmark
❯ make -f hack/build/aws.mk inspec-aws-kubernetes ENV=staging
VPC
❯ make -f hack/build/aws.mk inspec-test SERVICE=iac/aws/vpc ENV=staging
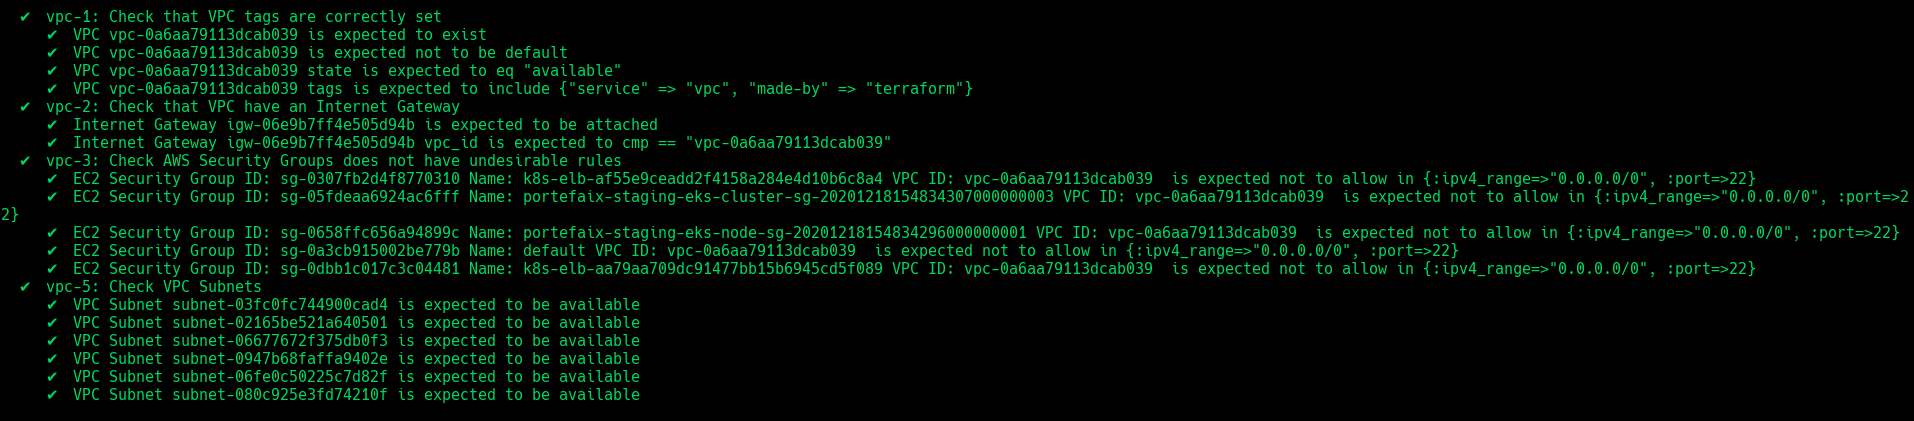
| Code | Description |
|---|---|
vpc-1 | Ensure that VPC exist and tags correcly set |
vpc-2 | Ensure that VPC have an Internet Gateway |
vpc-3 | Check AWS Security Groups does not have undesirable rules |
vpc-4 | Ensure that VPC Subnets exists |
EKS
❯ make -f hack/build/aws.mk inspec-test SERVICE=iac/aws/eks ENV=staging
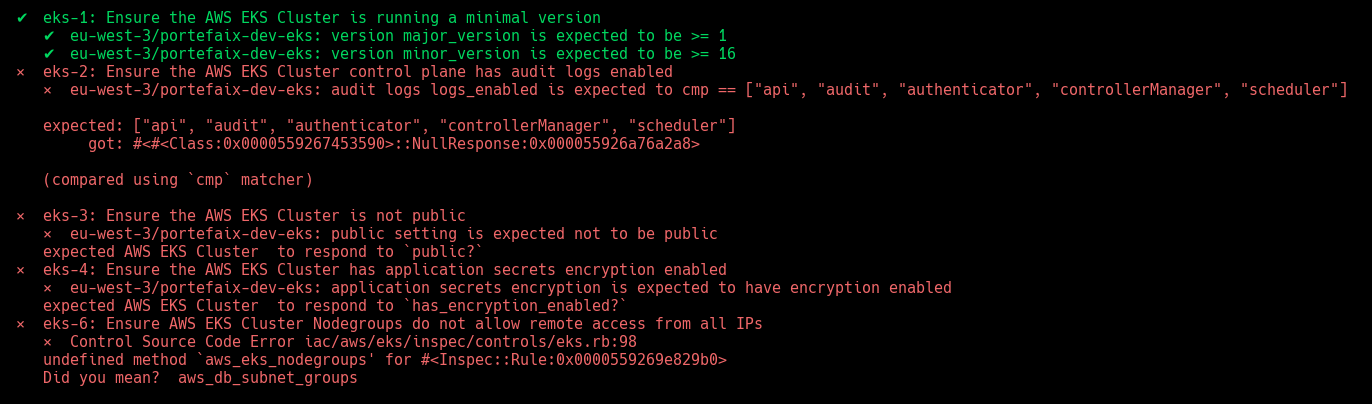
| Code | Description |
|---|---|
eks-1 | Ensure the AWS EKS Cluster is running a minimal version |
eks-2 | Ensure the AWS EKS Cluster control plane has audit logs enabled |
eks-3 | Ensure the AWS EKS Cluster is not public |
eks-4 | Ensure the AWS EKS Cluster has application secrets encryption enabled |
eks-5 | Ensure AWS EKS Cluster Subnets are specific |
eks-6 | Ensure AWS EKS Cluster Nodegroups do not allow remote access from all IPs |
Observability
❯ make -f hack/build/aws.mk inspec-test SERVICE=iac/aws/observability ENV=staging
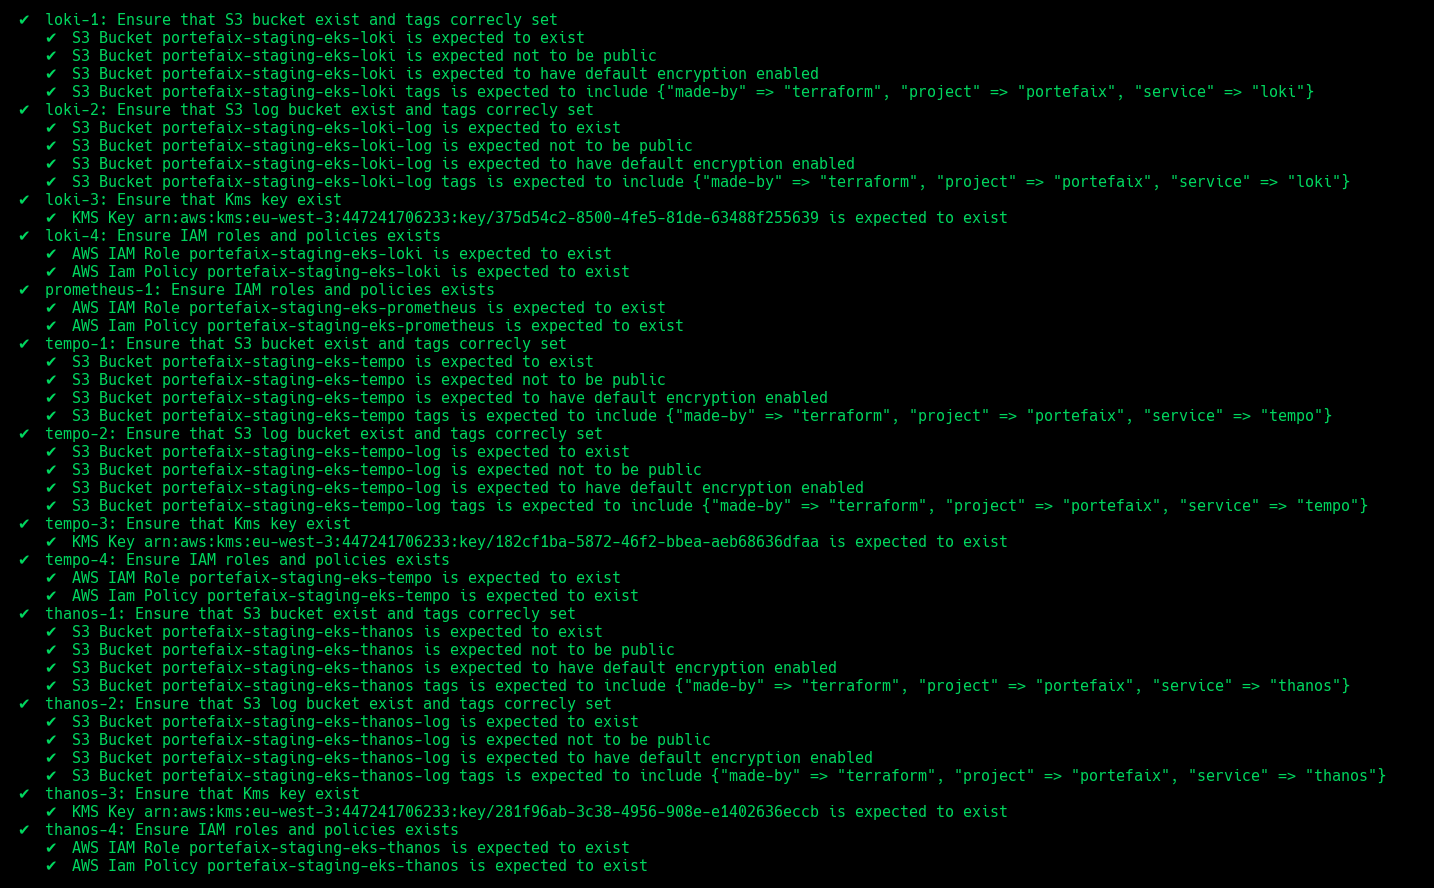
| Code | Description |
|---|---|
grafana-1 | Ensure IAM roles and policies exists |
prometheus-1 | Ensure IAM roles and policies exists |
thanos-1 | Ensure that S3 bucket exist and tags correcly set |
thanos-2 | Ensure that S3 log bucket exist and tags correcly set |
thanos-3 | Ensure that Kms key exist |
thanos-4 | Ensure IAM roles and policies exists |
loki-1 | Ensure that S3 bucket exist and tags correcly set |
loki-2 | Ensure that S3 log bucket exist and tags correcly set |
loki-3 | Ensure that Kms key exist |
loki-4 | Ensure IAM roles and policies exists |
tempo-1 | Ensure that S3 bucket exist and tags correcly set |
tempo-2 | Ensure that S3 log bucket exist and tags correcly set |
tempo-3 | Ensure that Kms key exist |
tempo-4 | Ensure IAM roles and policies exists |
1.2 - Microsoft Azure
1.2.1 - Overview


1.2.2 - Install on Microsoft Azure
Setup
Export Azure credentials:
❯ export AZURE_SUBSCRIPTION_ID="xxxxxx"
create a service principal:
❯ make -f hack/build/azure.mk azure-sp
The appId, password, and tenant values are used in the next step:
export ARM_SUBSCRIPTION_ID="<azure_subscription_id>"
export ARM_TENANT_ID="<azure_subscription_tenant_id>"
export ARM_CLIENT_ID="<service_principal_appid>"
export ARM_CLIENT_SECRET="<service_principal_password>"
Storage for Terraform
Create a Storage Account :
❯ make -f hack/build/azure.mk azure-storage-account
XXXXXXXXXXX
You could see the Key on the output.
Create storage container for Terraform states:
❯ make -f hack/build/azure.mk azure-storage-container AZ_STORAGE_ACCOUNT_KEY="xxxxxxxxxxxxxxxxx"
Set permissions:
❯ make -f hack/build/azure.mk azure-permissions
Enable preview features:
❯ make -f hack/build/azure.mk azure-wasi
Terraform
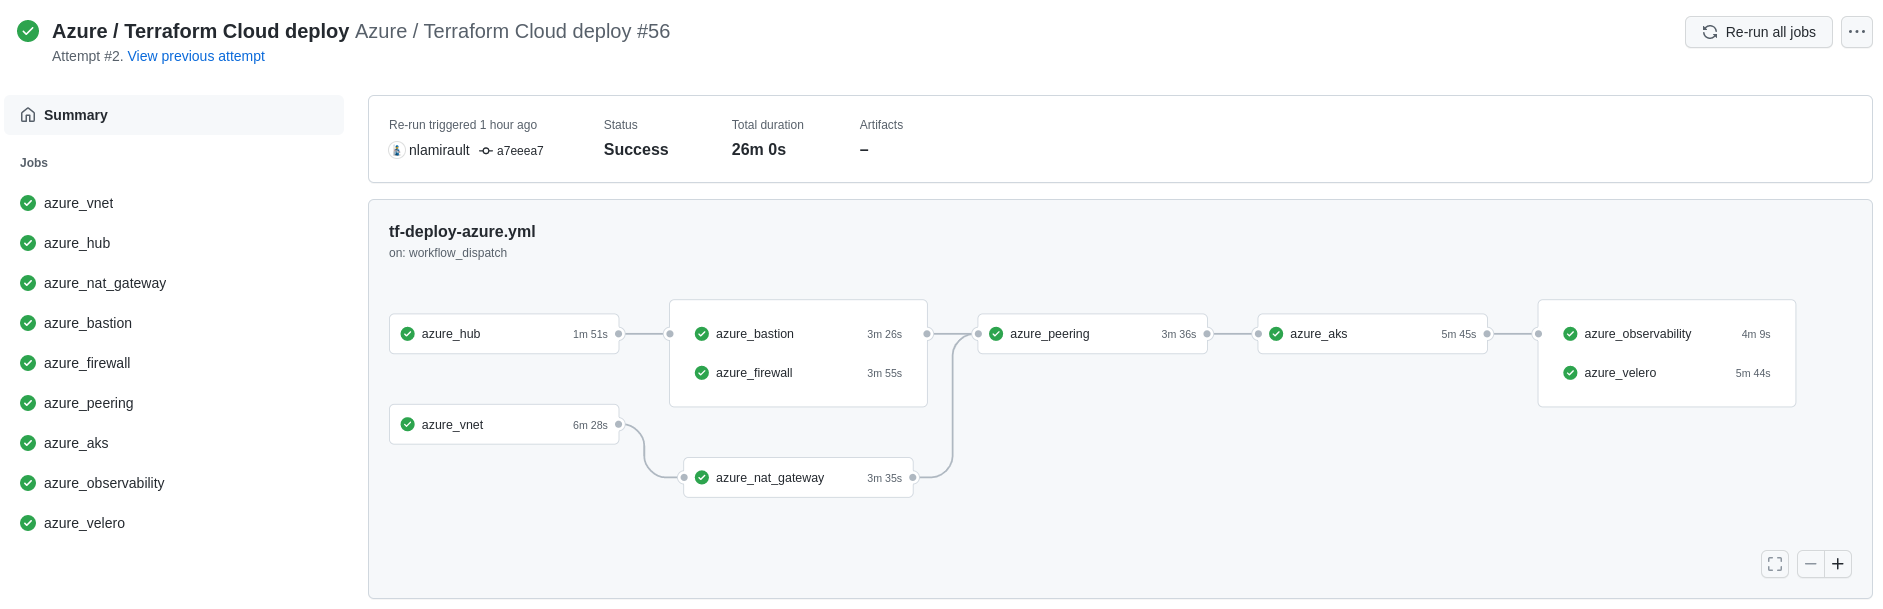
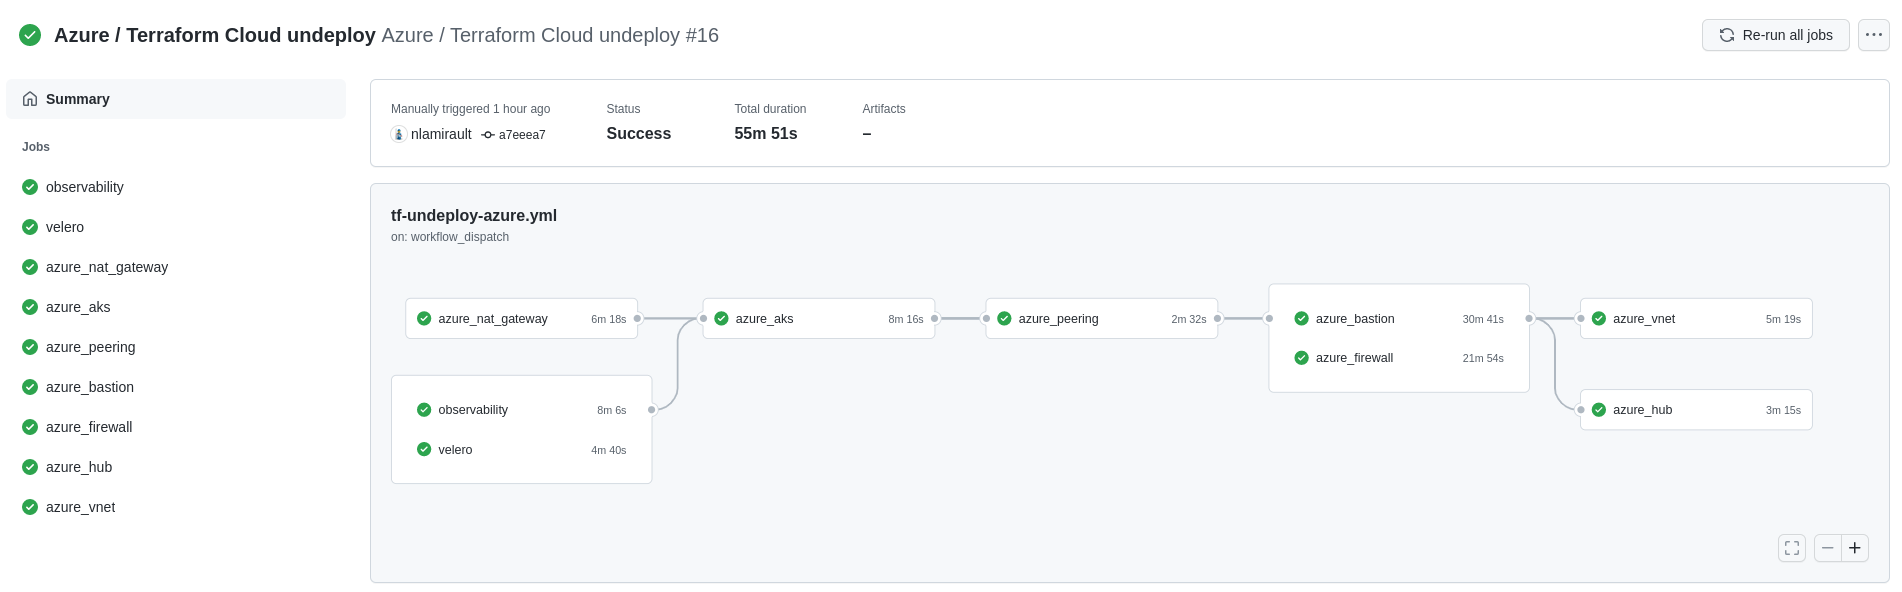
Github Actions with Terraform Cloud could used to deploy and undeploy the infrastructure:
Authentication and authorization
This section shows the how to setup Portefaix with authentication and authorization support in Microsoft Azure (AZURE)
❯ . ./portefaix.sh azure
[ Portefaix ]
Setup credentials
Done
Configure kubectl
❯ make -f hack/build/azure.mk azure-kube-credentials ENV=dev
❯ kubectl get nodes
NAME                           STATUS   ROLES   AGE   VERSION
aks-core-19506595-vmss000000   Ready    agent   8h    v1.18.10
Gitops for Kubernetes
Next: Gitops
Inspec
Setup
inspec is used to check infrastructure.
Check:
❯ make -f hack/build/azure.mk inspec-debug
Test infrastructure

 ────────────────────────────── Platform Details ──────────────────────────────

Name:      azure
Families:  cloud, api
Release:   azure_mgmt_resources-v0.17.8
Execute tests:
❯ make -f hack/build/azure.mk inspec-test SERVICE=iac/azure/<SERVICE> ENV=dev
You could upload JSON results file to Heimdall Lite to display ressults
Microsoft Azure CIS Foundations
You could perform tests accoring the CIS Microsoft Azure Foundations Security Benchmark:
❯ make -f hack/build/azure.mk inspec-cis ENV=dev
AKS

| Code | Description |
|---|---|
resourcegroup-1 | Check that resource group exists |
aks-1 | Ensure logging to Azure Monitor is configured |
aks-2 | Ensure RBAC is enabled |
aks-3 | Ensure API Server Authorized IP Ranges are configured |
1.3 - Google Cloud Platform


1.3.1 - Overview
1.3.2 - Install on Google Cloud Platform
Organization
Create a Google Cloud Organization using Google Workspace or Cloud Identity
See: https://cloud.google.com/resource-manager/docs/creating-managing-organization?hl=fr
Bootstrap
Authenticate on the Google Cloud Platform:
❯ gcloud auth login
xxxxxxxxxx

❯ gcloud organizations list
DISPLAY_NAME             ID  DIRECTORY_CUSTOMER_ID
xxxxxxx              xxxxxx               xxxxxxxx
You could find the GCP_USER:
❯ gcloud auth list
            Credentialed Accounts
ACTIVE  ACCOUNT
*       xxxxxxxxxxxx@portefaix.xyz
Create the Service Account on bootstrap project:
❯ make -f hack/build/gcp.mk gcp-bootstrap-sa
❯ make -f hack/build/gcp.mk gcp-bootstrap-credentials
❯ make -f hack/build/gcp.mk gcp-bootstrap-iam GCP_ORG_ID=xxxx
Enable APIs on Bootstrap project:
❯ make -f hack/build/gcp.mk gcp-bootstrap-apis
Bootstrap the organization:
❯ make -f hack/build/gcp.mk gcp-organization-bootstrap GCP_ORG_ID=xxxxxxxxxxx GCP_USER=xxxxxxxxxxxxxxxxx
Then go to https://console.cloud.google.com/cloud-setup/organization to creates groups and create the billing account.
Then create the bootstrap project:
❯ make -f hack/build/gcp.mk gcp-organization-project GCP_ORG_NAME=xxxx GCP_ORG_ID=xxxxxxxxxxx
Associate this project to the Billing Account (on GCP console or using gcloud):
gcloud alpha billing accounts projects link my-project --billing-account=xxxxxxx
Then create the bucket for boostraping the organization:
❯ make -f hack/build/gcp.mk gcp-bucket GCP_ORG_NAME=xxxxxxx
Bootstrap:
❯ make terraform-apply SERVICE=terraform/gcp/root ENV=main
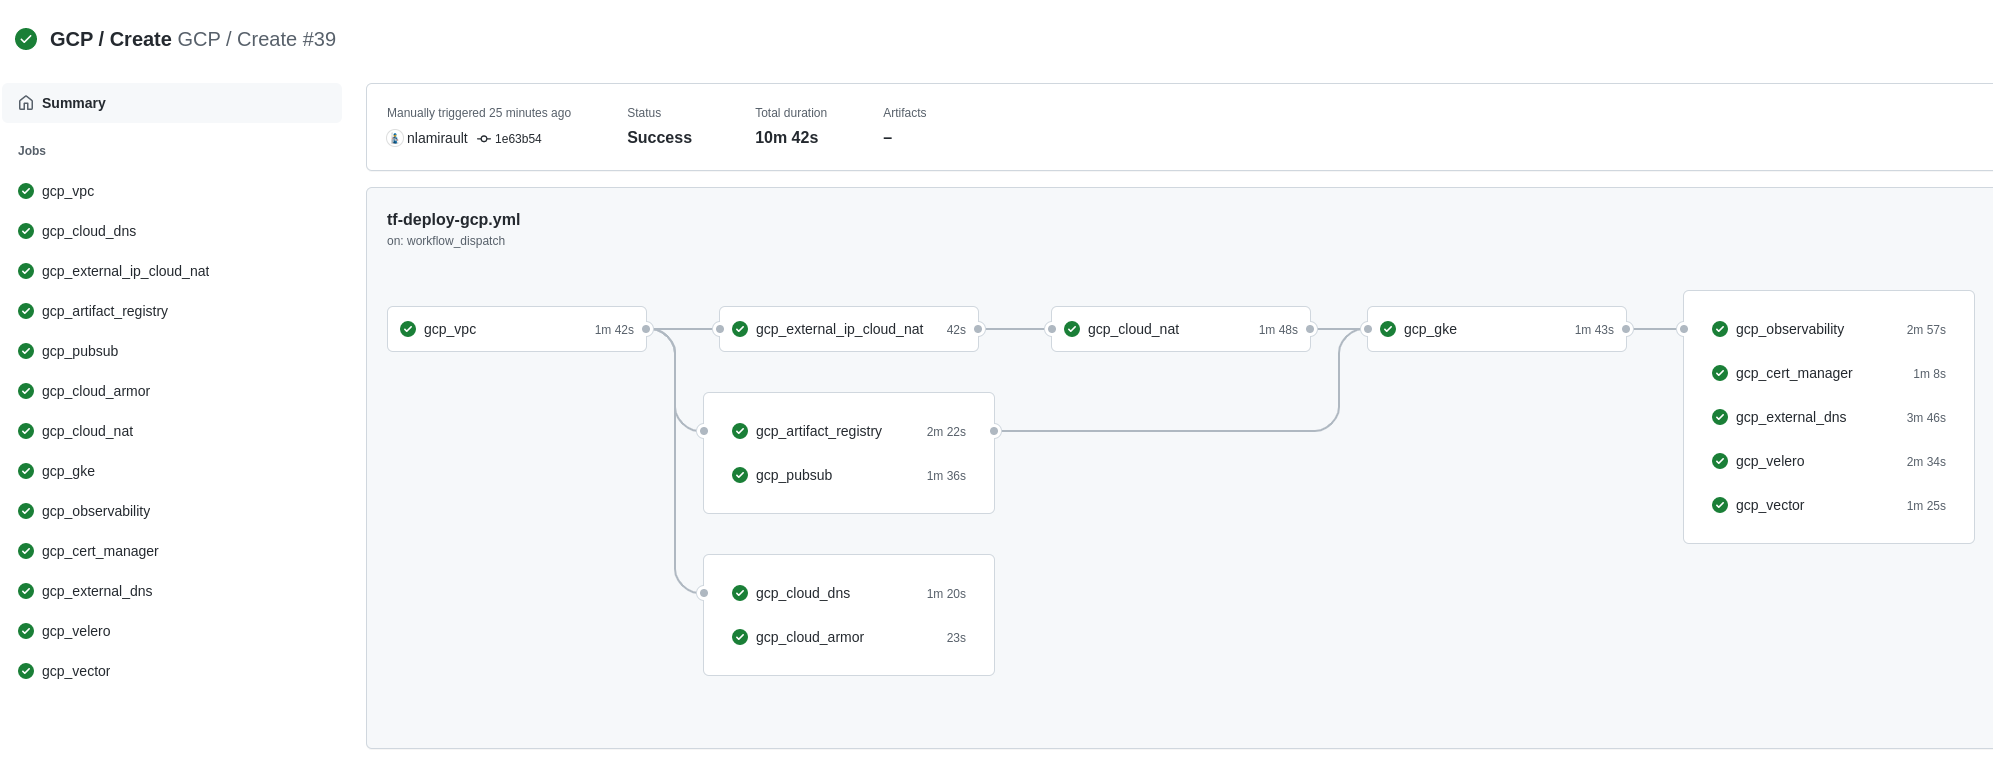
Terraform Cloud / Github Actions
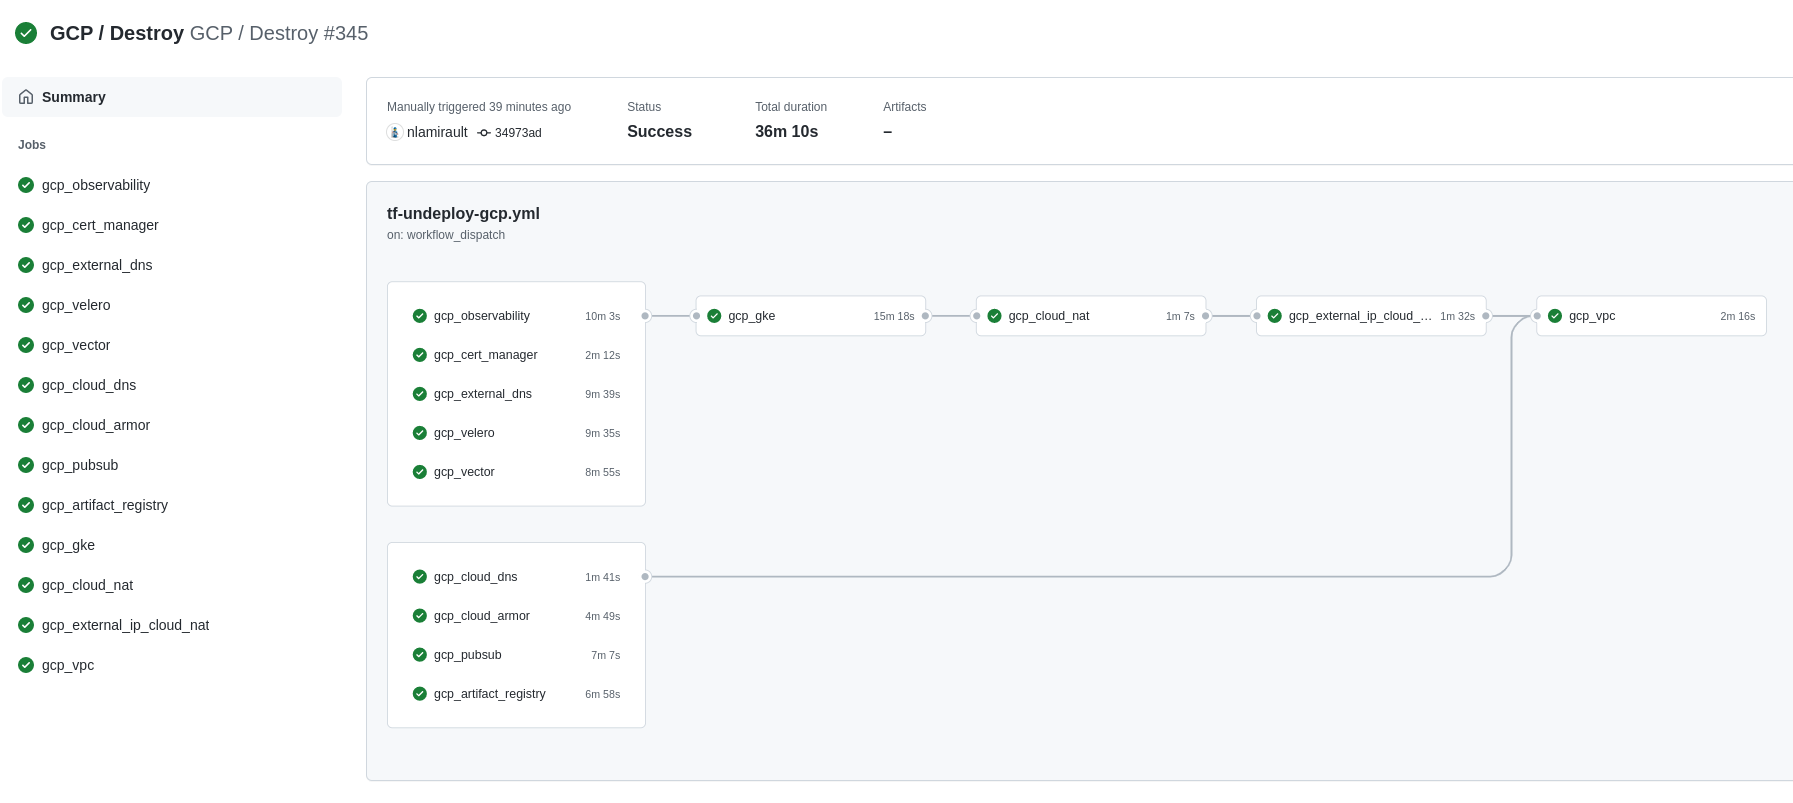
Terraform Cloud is used as the remote backend. Github Actions perform tasks to deploy and undeploy the GCP infrastructure.
Configure Terraform Cloud workspaces:
❯ make terraform-apply SERVICE=terraform/gcp/terraform-cloud ENV=main
Authentication and authorization
This section shows the how to setup Portefaix with authentication and authorization support in Google Cloud Platform (GCP).
Cloud IAP
To enable Cloud IAP, you need first to configure the OAuth consent screen. If you still haven’t configured the OAuth consent screen, you can do so with an email address and product name. See https://support.google.com/cloud/answer/6158849?hl=en#zippy=%2Cuser-consent
Then creates the Oauth credentials.
Select the OAuth client ID from the Create credentials drop-down list and then select web application from the
application type. Next, add a name for your OAuth client ID and click create.
Gcloud
❯ . ./portefaix.sh gcp
[ Portefaix ]
Setup credentials
Done
Kubernetes
❯ make -f hack/build/azure.mk gck-kube-credentials CLOUD=gcp ENV=dev
❯ kubectl get nodes
NAME                                                  STATUS   ROLES    AGE     VERSION
gke-xxxxxxxxxx-cluster-g-core-5d5d62be-tf15   Ready    <none>   7h37m   v1.18.10-gke.601
Gitops for Kubernetes
Next: Gitops
Inspec
inspec is used to check infrastructure:
❯ make -f hack/build/gcp.mk inspec-debug
Test infrastructure

 ────────────────────────────── Platform Details ──────────────────────────────

Name:      gcp
Families:  cloud, api
Release:   google-api-client-v0.34.1
Execute tests:
❯ make -f hack/build/gcp.mk inspec-test SERVICE=iac/gcp/<SERVICE> ENV=dev
You could upload JSON results file to Heimdall Lite to display ressults
CIS Kubernetes Benchmark
❯ make -f hack/build/gcp.mk inspec-gcp-kubernetes ENV=dev
GCP CIS
You could perform tests accoring the GCP CIS:
❯ make -f hack/build/gcp.mk inspec-cis ENV=dev
VPC
❯ make -f hack/build/gcp.mk inspec-test SERVICE=iac/gcp/vpc ENV=dev

| Code | Description |
|---|---|
vpc-1 | Ensure default network is deleted |
vpc-2 | Ensure network is correctly configure |
GKE
❯ make -f hack/build/gcp.mk gcp-inspec-test SERVICE=iac/gcp/gke ENV=dev
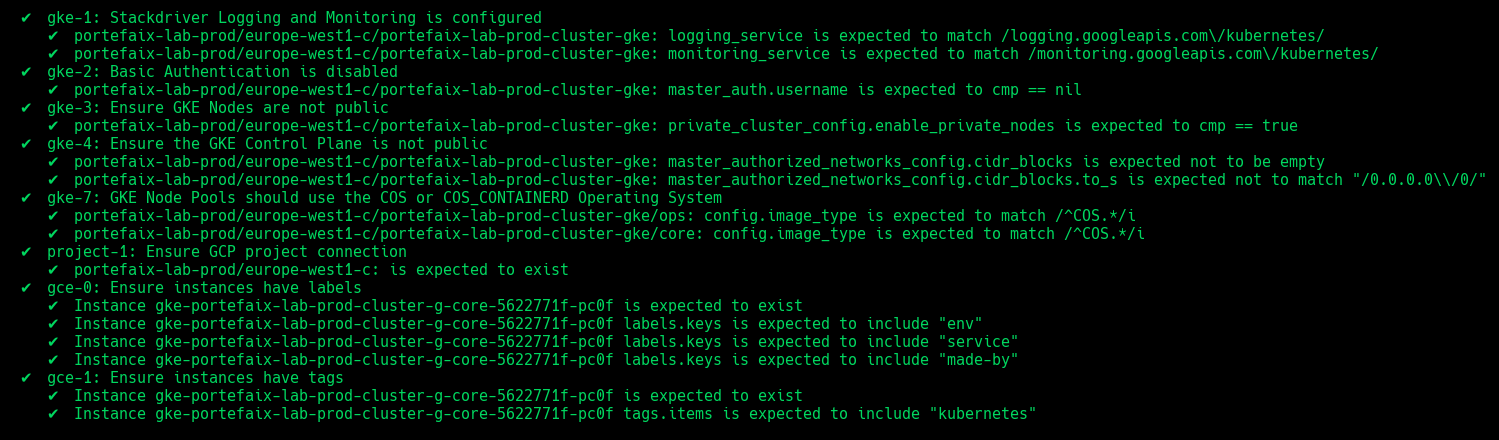
| Code | Description |
|---|---|
gke-1 | Stackdriver Logging and Monitoring is configured |
gke-2 | Basic Authentication is disabled |
gke-3 | Ensure GKE Nodes are not public |
gke-4 | Ensure the GKE Control Plane is not public |
gke-5 | Ensure the Network Policy managed addon is enabled |
gke-6 | Ensure OAuth Access Scopes and dedicated Service Accounts for node pools |
gke-7 | Ensure GKE Node Pools should use the COS or COS_CONTAINERD Operating System |
gke-8 | GKE Workload Identity should be enabled on all node pools |
gke-9 | GKE Shielded Nodes should be enabled on all NodePools |
gke-10 | Ensure instances have labels |
gke-11 | Ensure instances have tags |
Sops
❯ make -f hack/build/gcp.mk gcp-inspec-test SERVICE=iac/gcp/sops ENV=dev

| Code | Description |
|---|---|
sops-1 | Ensure service account and IAM binding exists |
sops-2 | Ensure that Kms key exist |
Observability
❯ make -f hack/build/gcp.mk gcp-inspec-test SERVICE=iac/gcp/observability ENV=dev
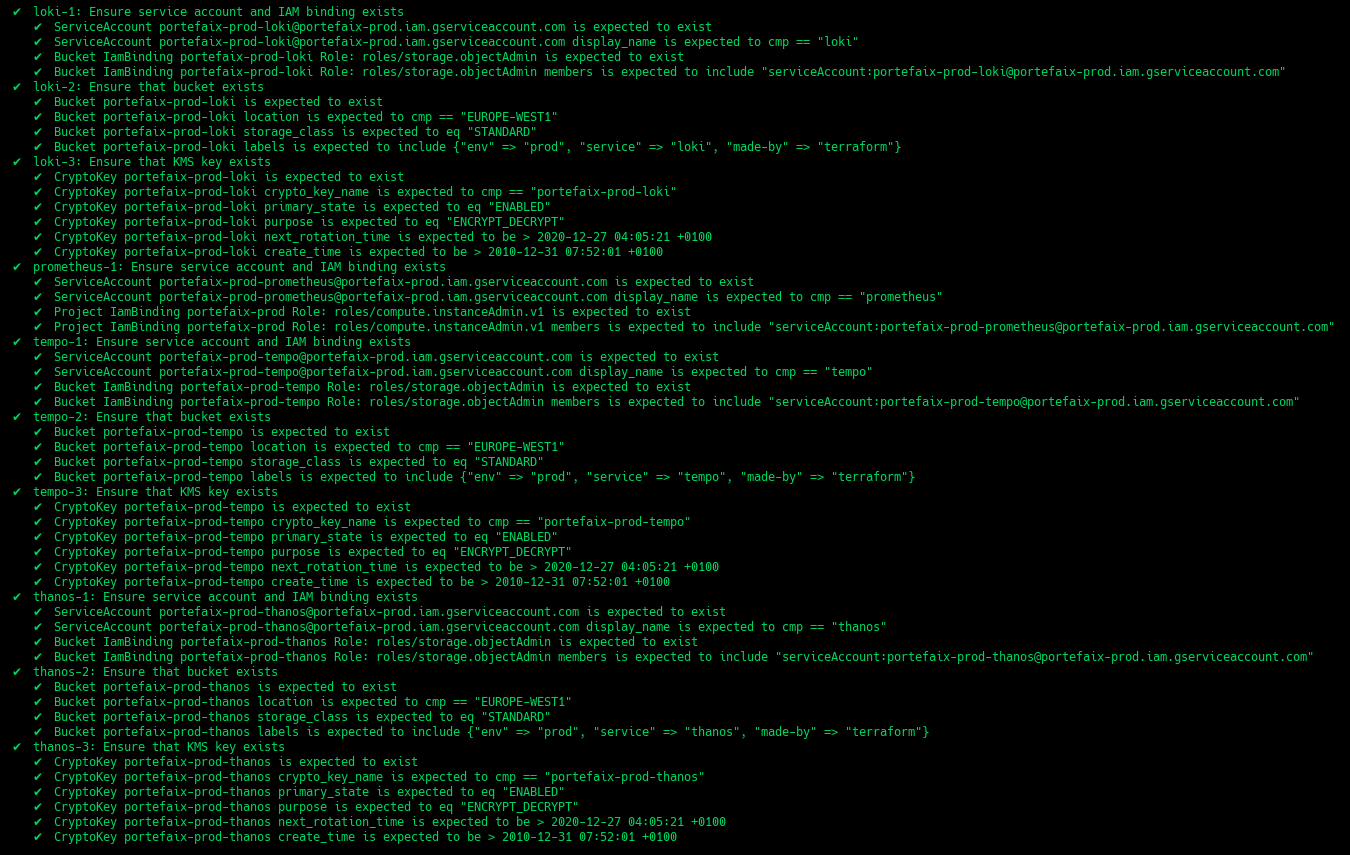
| Code | Description |
|---|---|
grafana-1 | Ensure service account and IAM binding exists |
prometheus-1 | Ensure service account and IAM binding exists |
thanos-1 | Ensure service account and IAM binding exists |
thanos-2 | Ensure that bucket exists and labels correcly set |
thanos-3 | Ensure that Kms key exist |
loki-1 | Ensure service account and IAM binding exists |
loki-2 | Ensure that bucket exists and labels correcly set |
loki-3 | Ensure that Kms key exist |
tempo-1 | Ensure service account and IAM binding exists |
tempo-2 | Ensure that bucket exists and labels correcly set |
tempo-3 | Ensure that Kms key exist |
Velero
❯ make -f hack/build/gcp.mk gcp-inspec-test SERVICE=iac/gcp/velero ENV=dev

| Code | Description |
|---|---|
velero-1 | Ensure service account and IAM binding exists |
velero-2 | Ensure that bucket exists and labels correcly set |
velero-3 | Ensure that Kms key exist |
Vector
❯ make -f hack/build/gcp.mk gcp-inspec-test SERVICE=iac/gcp/vector ENV=dev

| Code | Description |
|---|---|
vector-1 | Ensure service account and IAM binding exists |
vector-2 | Ensure that bucket exists and labels correcly set |
vector-3 | Ensure that Kms key exist |
External-DNS
❯ make -f hack/build/gcp.mk gcp-inspec-test SERVICE=iac/gcp/external-dns ENV=dev

| Code | Description |
|---|---|
external_dns-1 | Ensure service account and IAM binding exists |
1.4 - Alicloud
1.4.1 - Overview


1.4.2 - Install on Alibaba Cloud
Setup
Create an admin user, then API Keys.
And configure Portefaix environment file ${HOME}/.config/portefaix/portefaix.sh:
# Alicloud
function setup_alicloud() {
    # Alicloud User: Portefaix Admin
    export ALICLOUD_ACCESS_KEY="xxxxxxxxxx"
    export ALICLOUD_SECRET_KEY="xxxxxxxxxxxxxxxx"
    export ALICLOUD_REGION="eu-central-1"
    # For Terraform Cloud
    export TF_VAR_access_key="${ALICLOUD_ACCESS_KEY}"
    export TF_VAR_secret_key="${ALICLOUD_SECRET_KEY}"
    export TF_VAR_region="${ALICLOUD_REGION}"
}
And load environment :
❯ . ./portefaix.sh alicloud
Storage for Terraform
Create an OSS bucket for Terraform states:
❯ make -f hack/build/alicloud.mk aliyun-bucket-create ENV=staging
Create a TableStore instance:
❯ make -f hack/build/alicloud.mk aliyun-tablestore-create ENV=staging
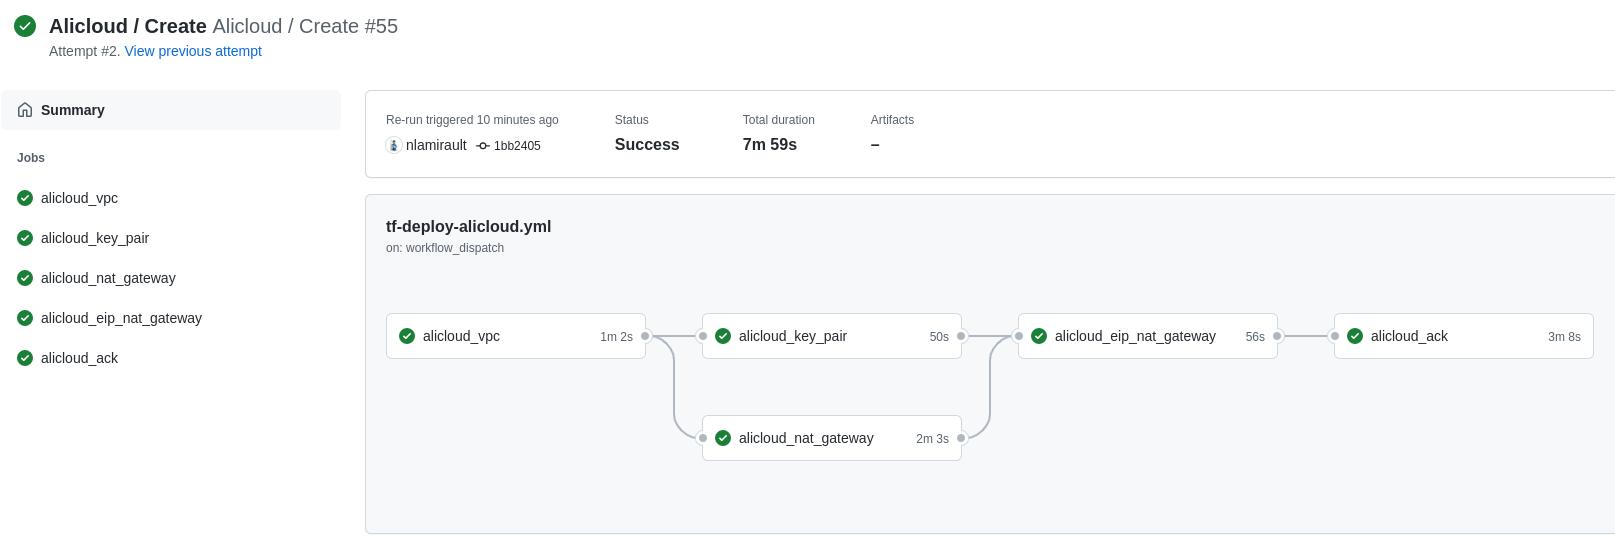
Terraform Cloud / Github Actions
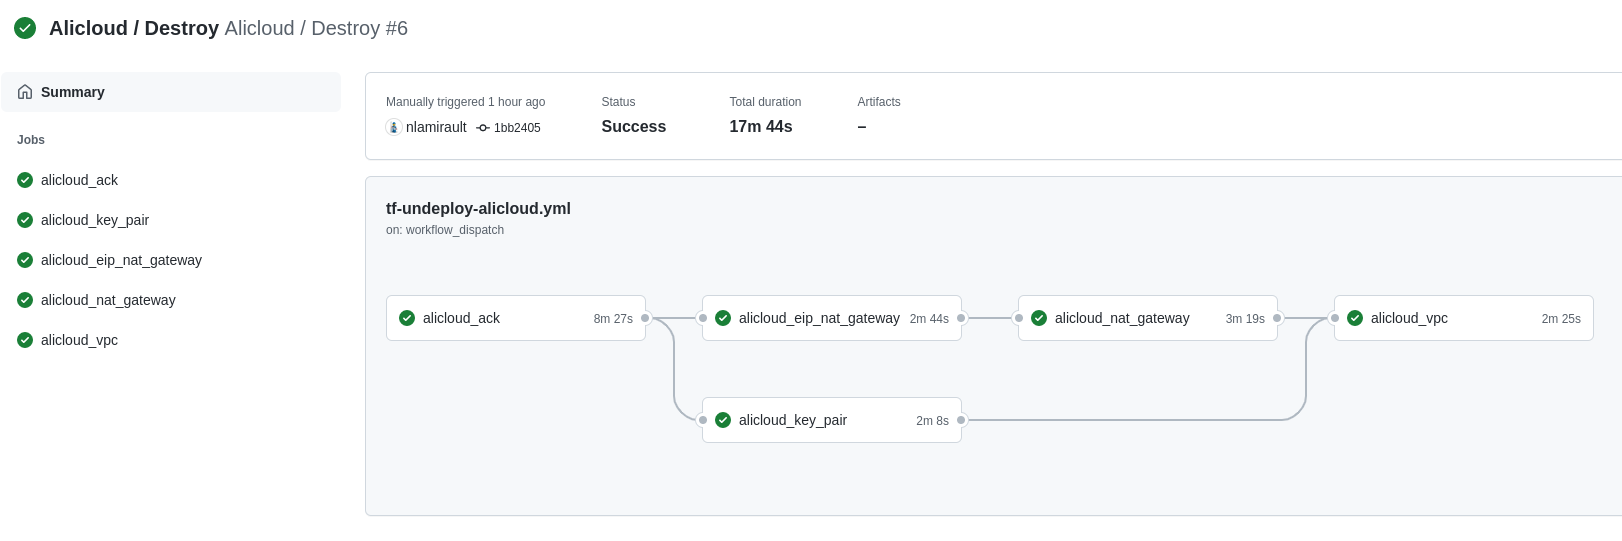
Terraform Cloud is used as the remote backend. Github Actions perform tasks to deploy the Alibaba Cloud infrastructure and undeploy:
Authentication and authorization
This section shows the how to setup Portefaix with authentication and authorization support in Alibaba Cloud
Configure Alibaba Cloud
❯ . ./portefaix.sh alicloud
[ Portefaix ]
Setup credentials
Done
Bastion
Work In Progress
Configure kubectl
Work In Progress
❯ make kubernetes-credentials CLOUD=alicloud ENV=staging
❯ kubectl get nodes
NAME                                        STATUS   ROLES    AGE    VERSION
Gitops for Kubernetes
Next: Gitops
Inspec for Alicloud
Setup
Inspec is used to check infrastructure.
Check:
❯ make -f hack/build/alicloud.mk inspec-alicloud-debug
Execute tests:
Work In Progress
CIS Kubernetes Benchmark
❯ make -f hack/build/alicloud.mk inspec-alicloud-kubernetes ENV=staging
1.5 - Scaleway
1.5.1 - Overview


1.5.2 - Install on Scaleway
Setup
# Scaleway
function setup_scaleway() {
    export SCW_ACCESS_KEY="xxxxx"
    export SCW_SECRET_KEY="xxxx"
    export SCW_DEFAULT_PROJECT_ID="xxxx"
    export SCW_DEFAULT_ORGANIZATION_ID="${SCW_DEFAULT_PROJECT_ID}"
    export AWS_ACCESS_KEY_ID="${SCW_ACCESS_KEY}"
    export AWS_SECRET_ACCESS_KEY="${SCW_SECRET_KEY}"
    export AWS_DEFAULT_REGION="eu-west-3"
    export AWS_REGION="eu-west-3"
}
And load environment :
❯ . ./portefaix.sh scaleway
Storage for Terraform
Create a S3 bucket for Terraform states:
❯ make -f hack/build/scw.mk scw-bucket ENV=sandbox
Terraform
SKS
❯ make terraform-apply SERVICE=iac/scaleway/kapsule ENV=sandbox
Authentication and authorization
This section shows the how to setup Portefaix with authentication and authorization support in Scaleway
Configure Scaleway
❯ . ./portefaix.sh scaleway
[ Portefaix ]
Setup credentials
Done
Configure kubectl
❯ make kubernetes-credentials CLOUD=scaleway ENV=sandbox
❯ kubectl get nodes
Gitops for Kubernetes
Next: Gitops
1.6 - Digital Ocean
1.6.1 - Overview


1.6.2 - Install on Digital Ocean
Setup
# Digital Ocean
function setup_digitalocean() {
    export DIGITALOCEAN_TOKEN="xxxxxxxxxxxx"
    export SPACES_ENDPOINT_URL="fra1.digitaloceanspaces.com"
    export SPACES_ACCESS_KEY_ID="xxxxxxxxxx"
    export SPACES_SECRET_ACCESS_KEY="xxxxxxxxxxxxxxx"
    export AWS_ACCESS_KEY_ID="${SPACES_ACCESS_KEY_ID}"
    export AWS_SECRET_ACCESS_KEY="${SPACES_SECRET_ACCESS_KEY}"
    export AWS_DEFAULT_REGION="eu-west-3"
    export AWS_REGION="eu-west-3"
}
And load environment :
❯ . ./portefaix.sh digitalocean
Storage for Terraform
Create a S3 bucket for Terraform states:
❯ make -f hack/build/digitalocean.mk exo-bucket ENV=dev
Authentication and Authorization
This section shows the how to setup Portefaix with authentication and authorization support in Digital Ocean
Configure Digital Ocean
❯ . ./portefaix.sh digitalocean
[ Portefaix ]
Setup credentials
Done
Configure kubectl
❯ make kubernetes-credentials CLOUD=digitalocean ENV=dev
❯ kubectl get nodes
Gitops for Kubernetes
Next: Gitops
1.7 - Exoscale
1.7.1 - Overview


1.7.2 - Install on Exoscale
Setup
# AWS
export EXOSCALE_API_KEY="xxxxx"
export EXOSCALE_API_SECRET="xxxxxxxxxxx"
export AWS_ACCESS_KEY_ID="${EXOSCALE_API_KEY}"
export AWS_SECRET_ACCESS_KEY="${EXOSCALE_API_SECRET}"
And load environment :
❯ . ./portefaix.sh exoscale
Storage for Terraform
Create a S3 bucket for Terraform states:
❯ make -f hack/build/exoscale.mk exo-bucket ENV=dev
Terraform
SKS
❯ make terraform-apply SERVICE=iac/exoscale/sks ENV=dev
Authentication and authorization
This section shows the how to setup Portefaix with authentication and authorization support in Exoscale
Configure Exoscale
❯ . ./portefaix.sh exoscale
[ Portefaix ]
Setup credentials
Done
Configure kubectl
❯ make kubernetes-credentials CLOUD=exoscale ENV=dev
❯ kubectl get nodes
Gitops for Kubernetes
Next: Gitops
1.8 - Civo
1.8.1 - Overview


1.8.2 - Install on Civo
Setup
# Civo
export CIVO_TOKEN="xxxxxxxxxxxxxxxx"
And load environment :
❯ . ./portefaix.sh civo
Storage for Terraform
Work In Progress
Terraform
Network
❯ make terraform-apply SERVICE=terraform/civo/network ENV=dev
Kubernetes
❯ make terraform-apply SERVICE=terraform/civo/kubernetes ENV=dev
Authentication and authorization
This section shows the how to setup Portefaix with authentication and authorization support in Civo
Configure Civo
❯ . ./portefaix.sh civo
[ Portefaix ]
Flux
Pagerduty
TerraformCloud
Civo
✔ Done
Configure kubectl
❯ make -f hack/build/civo.mk civo-kube-credentials ENV=dev
❯ kubectl get nodes
NAME                                                      STATUS   ROLES    AGE     VERSION
k3s-portefaix-dev-civo-691a-de1391-node-pool-8c2e-859cq   Ready    <none>   6m29s   v1.22.2+k3s1
Gitops for Kubernetes
Next: Gitops
1.9 - IBM Cloud
1.9.1 - Install on IBM Cloud


1.9.2 - Install on IBMCloud
Setup
# IBMCloud
export IAAS_CLASSIC_USERNAME="xxxxxxxxxxxx"
export IC_API_KEY="xxxxxxxxxxxxxx"
export IAAS_CLASSIC_API_KEY="xxxxxxxxxxxxxxxxx"
# For Terraform Backend S3
# See
And load environment :
❯ . ./portefaix.sh ibmcloud
Authentication:
❯ make -f hack/build/ibmcloud.mk ibmcloud-init ENV=staging
Then, generate the right set of HMAC credentials : documentation
❯ export AWS_ACCESS_KEY_ID="xxxxxxxxxx"
❯ export AWS_SECRET_ACCESS_KEY="xxxxxxxxxxxxxxx"
Storage for Terraform
Create a S3 bucket for Terraform states:
❯ make -f hack/build/ibmcloud.mk ibmcloud-bucket-create ENV=staging
Terraform
VPC
❯ make terraform-apply SERVICE=terraform/ibmcloud/vpc ENV=staging
IKS
❯ make terraform-apply SERVICE=terraform/ibmcloud/iks ENV=staging
Authentication and authorization
This section shows the how to setup Portefaix with authentication and authorization support in IBMCloud
Configure IBMCloud CLI
❯ . ./portefaix.sh ibmcloud
[ Portefaix ]
✔ Configuration file
✔ Flux
✔ PagerDuty
✔ Terraform Cloud
✔ IBMCloud
Configure kubectl
❯ make -f hack/build/ibmcloud.mk ibmcloud-kube-credentials CLOUD=ibmcloud ENV=staging
❯ kubectl get nodes
NAME            STATUS   ROLES    AGE   VERSION
10.242.0.10     Ready    <none>   13m   v1.22.7+IKS
10.242.0.7      Ready    <none>   29m   v1.22.7+IKS
10.242.128.10   Ready    <none>   12m   v1.22.7+IKS
10.242.128.7    Ready    <none>   29m   v1.22.7+IKS
10.242.64.6     Ready    <none>   29m   v1.22.7+IKS
10.242.64.8     Ready    <none>   13m   v1.22.7+IKS
Gitops for Kubernetes
Next: Gitops
1.10 - Oracle Cloud Infrastructure
1.10.1 - Install Portefaix
Setup
Configure Oracle CLI. See https://docs.oracle.com/en-us/iaas/Content/API/Concepts/apisigningkey.htm
Load environment :
❯ . ./portefaix.sh oci
Then authentication:
❯ make -f hack/build/oci.mk oci-authenticate ENV=staging
Create a new compartment
❯ make -f hack/build/oci.mk oci-compartment ENV=staging
Storage for Terraform
Check compartement ID from output of the previous command and create a S3 bucket for Terraform states:
❯ make -f hack/build/oci.mk oci-bucket ENV=staging COMPARTMENT_ID=ocid1.compartment.oc1....
Bootstrap:
❯ make terraform-apply SERVICE=terraform/oci/root ENV=main
❯ make terraform-apply SERVICE=terraform/oci/terraform-cloud ENV=main
Terraform Cloud / Github Actions
Terraform Cloud is used as the remote backend. Github Actions perform tasks to deploy the Oracle Cloud Infrastructure.
Configure Terraform Cloud workspaces:
❯ make terraform-apply SERVICE=terraform/oci/terraform-cloud ENV=main
Authentication and authorization
This section shows the how to setup Portefaix with authentication and authorization support in Exoscale
Configure Exoscale
❯ . ./portefaix.sh exoscale
[ Portefaix ]
Setup credentials
Done
Configure kubectl
❯ make kubernetes-credentials CLOUD=exoscale ENV=dev
❯ kubectl get nodes
Gitops for Kubernetes
Next: Gitops
1.10.2 - Overview


1.11 - Homelab


1.11.1 - Install Portefaix
Operating System
Setup operating system for Raspberry PI.
See: https://www.raspberrypi.org/software/
Or:
❯ sudo dd if=/dev/zero of=/dev/mmcblk0 conv=noerror status=progress
❯ sudo./hack/scripts/sdcard.sh <hostname> /dev/mmcblk0
Enable SSH :
❯ make -f hack/build/k3s.mk sdcard-mount ENV=homelab
❯ sudo touch /mnt/portefaix/boot/ssh
❯ echo portefaix-xxx | sudo tee /mnt/portefaix/root/etc/hostname
❯ make -f hack/build/k3s.mk sdcard-unmount ENV=homelab
Copy keys to each node:
ssh-copy-id -i ~/.ssh/id_rsa.pub pi@x.x.x.x
Ansible
❯ make ansible-deps SERVICE=ansible/k3s/machines CLOUD=k3s ENV=homelab
❯ make ansible-run SERVICE=ansible/k3s/machines CLOUD=k3s ENV=homelab
K3Sup
Create the master :
❯ make -f hack/build/k3s.mk k3s-create ENV=homelab SERVER_IP=x.x.x.x EXTERNAL_IP=x.x.x.x
For each node, add it to the cluster, then add a label:
❯ make -f hack/build/k3s.mk k3s-join ENV=homelab SERVER_IP=x.x.x.x AGENT_IP=x.x.x.x EXTERNAL_IP=x.x.x.x
Authentication and authorization
❯ make kubernetes-credentials CLOUD=k3s ENV=homelab
Set labels:
❯ kubectl label node <NODE_NAME> node-role.kubernetes.io/worker=true
We add also these labels:
| Label | Description |
|---|---|
| node-role.kubernetes.io/infra=true | For core components |
| node-role.kubernetes.io/lowcost=true | For pocs, small applications, … |
The nodes are in a NotReady state, due to the Pod Networking CNI plugin is not available.
Cilium must be installed:
❯ make bootstrap-crds ENV=homelab CLOUD=k3s
❯ make bootstrap-cilium ENV=homelab CLOUD=k3s
Then check nodes:
❯ kubectl get node -o wide
NAME          STATUS     ROLES                       AGE     VERSION        INTERNAL-IP     EXTERNAL-IP      OS-IMAGE           KERNEL-VERSION     CONTAINER-RUNTIME
portefaix     Ready      control-plane,etcd,master   3h37m   v1.30.2+k3s1   192.168.0.61    100.79.205.64    Ubuntu 24.04 LTS   6.8.0-36-generic   containerd://1.7.17-k3s1
portefaix-1   NotReady   lowcost,worker              155m    v1.30.2+k3s1   192.168.0.208   100.115.34.57    Ubuntu 24.04 LTS   6.8.0-1005-raspi   containerd://1.7.17-k3s1
portefaix-2   Ready      lowcost,worker              154m    v1.30.2+k3s1   192.168.0.116   100.126.100.42   Ubuntu 24.04 LTS   6.8.0-1005-raspi   containerd://1.7.17-k3s1
portefaix-6   Ready      infra,worker                3h21m   v1.30.2+k3s1   192.168.0.233   100.111.218.32   Ubuntu 24.04 LTS   6.8.0-36-generic   containerd://1.7.17-k3s1
portefaix-7   Ready      infra,worker                3h18m   v1.30.2+k3s1   192.168.0.250   100.86.220.99    Ubuntu 24.04 LTS   6.8.0-36-generic   containerd://1.7.17-k3s1
and Cilium status:
❯ cilium status
    /¯¯\
 /¯¯\__/¯¯\    Cilium:         OK
 \__/¯¯\__/    Operator:       OK
 /¯¯\__/¯¯\    Hubble:         OK
 \__/¯¯\__/    ClusterMesh:    disabled
    \__/

Deployment        cilium-operator    Desired: 1, Ready: 1/1, Available: 1/1
DaemonSet         cilium             Desired: 4, Ready: 4/4, Available: 4/4
Deployment        hubble-relay       Desired: 1, Ready: 1/1, Available: 1/1
Deployment        hubble-ui          Desired: 1, Ready: 1/1, Available: 1/1
Containers:       cilium             Running: 4
                  cilium-operator    Running: 1
                  hubble-relay       Running: 1
                  hubble-ui          Running: 1
Cluster Pods:     4/4 managed by Cilium
Cloudflare
R2 is used to store the Terraform states and for S3 buckets
Setup your Cloudflare Account ID, and your AWS credentials
function setup_cloudflare() {
    echo_info "Cloudflare"
    export CLOUDFLARE_ACCOUNT_ID="xxxxxxxx"
    export AWS_ACCESS_KEY_ID="xxxxxxxxxxx"
    export AWS_SECRET_ACCESS_KEY="xxxxxxxxxxxx"
}

function setup_cloud_provider {
    case $1 in

        ...

        "k3s")
            setup_tailscale
            setup_freebox
            setup_cloudflare
            ;;
        *)
            echo -e "${KO_COLOR}Invalid cloud provider: $1.${NO_COLOR}"
            usage
            ;;
    esac
}
The creates the bucket for Terraform:
❯ make -f hack/build/k3s.mk cloudflare-bucket-create ENV=homelab
[portefaix] Create bucket for Terraform states
{
    "Location": "/portefaix-homelab-tfstates"
}
Terraform
Configure DNS:
❯ make terraform-apply SERVICE=terraform/k3s/dns ENV=homelab
Creates the R2 buckets for Observability components:
❯ make terraform-apply SERVICE=terraform/k3s/observability ENV=homelab
Applications
Next: Gitops
1.11.2 - Overview
2 - Cloud Native Applications
2.2 - Argo-CD
Organization
gitops/argocd/bootstrap: Argo-CD deploymentgitops/argocd/stacks: Portefaix stacks : Argo-CD projects and applicationsgitops/argocd/apps/<CLOUD>/<ENVIRONMENT>: Argo-CD applications deployed into the Kubernetes clustergitops/argocd/charts: Helm charts configurations
To configure the Helm charts, we use YAML files :
values.yaml: common configuration to all Kubernetes clustervalues-<CLOUD>-<ENVIRONMENT>.yaml: configuration of the Helm chart for a Kubernetes cluster
Bootstrap
Argo-CD
❯ make bootstrap-argocd ENV=<environment> CLOUD=<cloud provider> CHOICE=helm
Stacks
Install a stack into the cluster:
❯ make argocd-stack-install ENV=<environment> CLOUD=<cloud provider> STACK=<stack name>
Stacks:
- Core
- System
- Networking
- Security
- Observability
- Chaos
- Tools
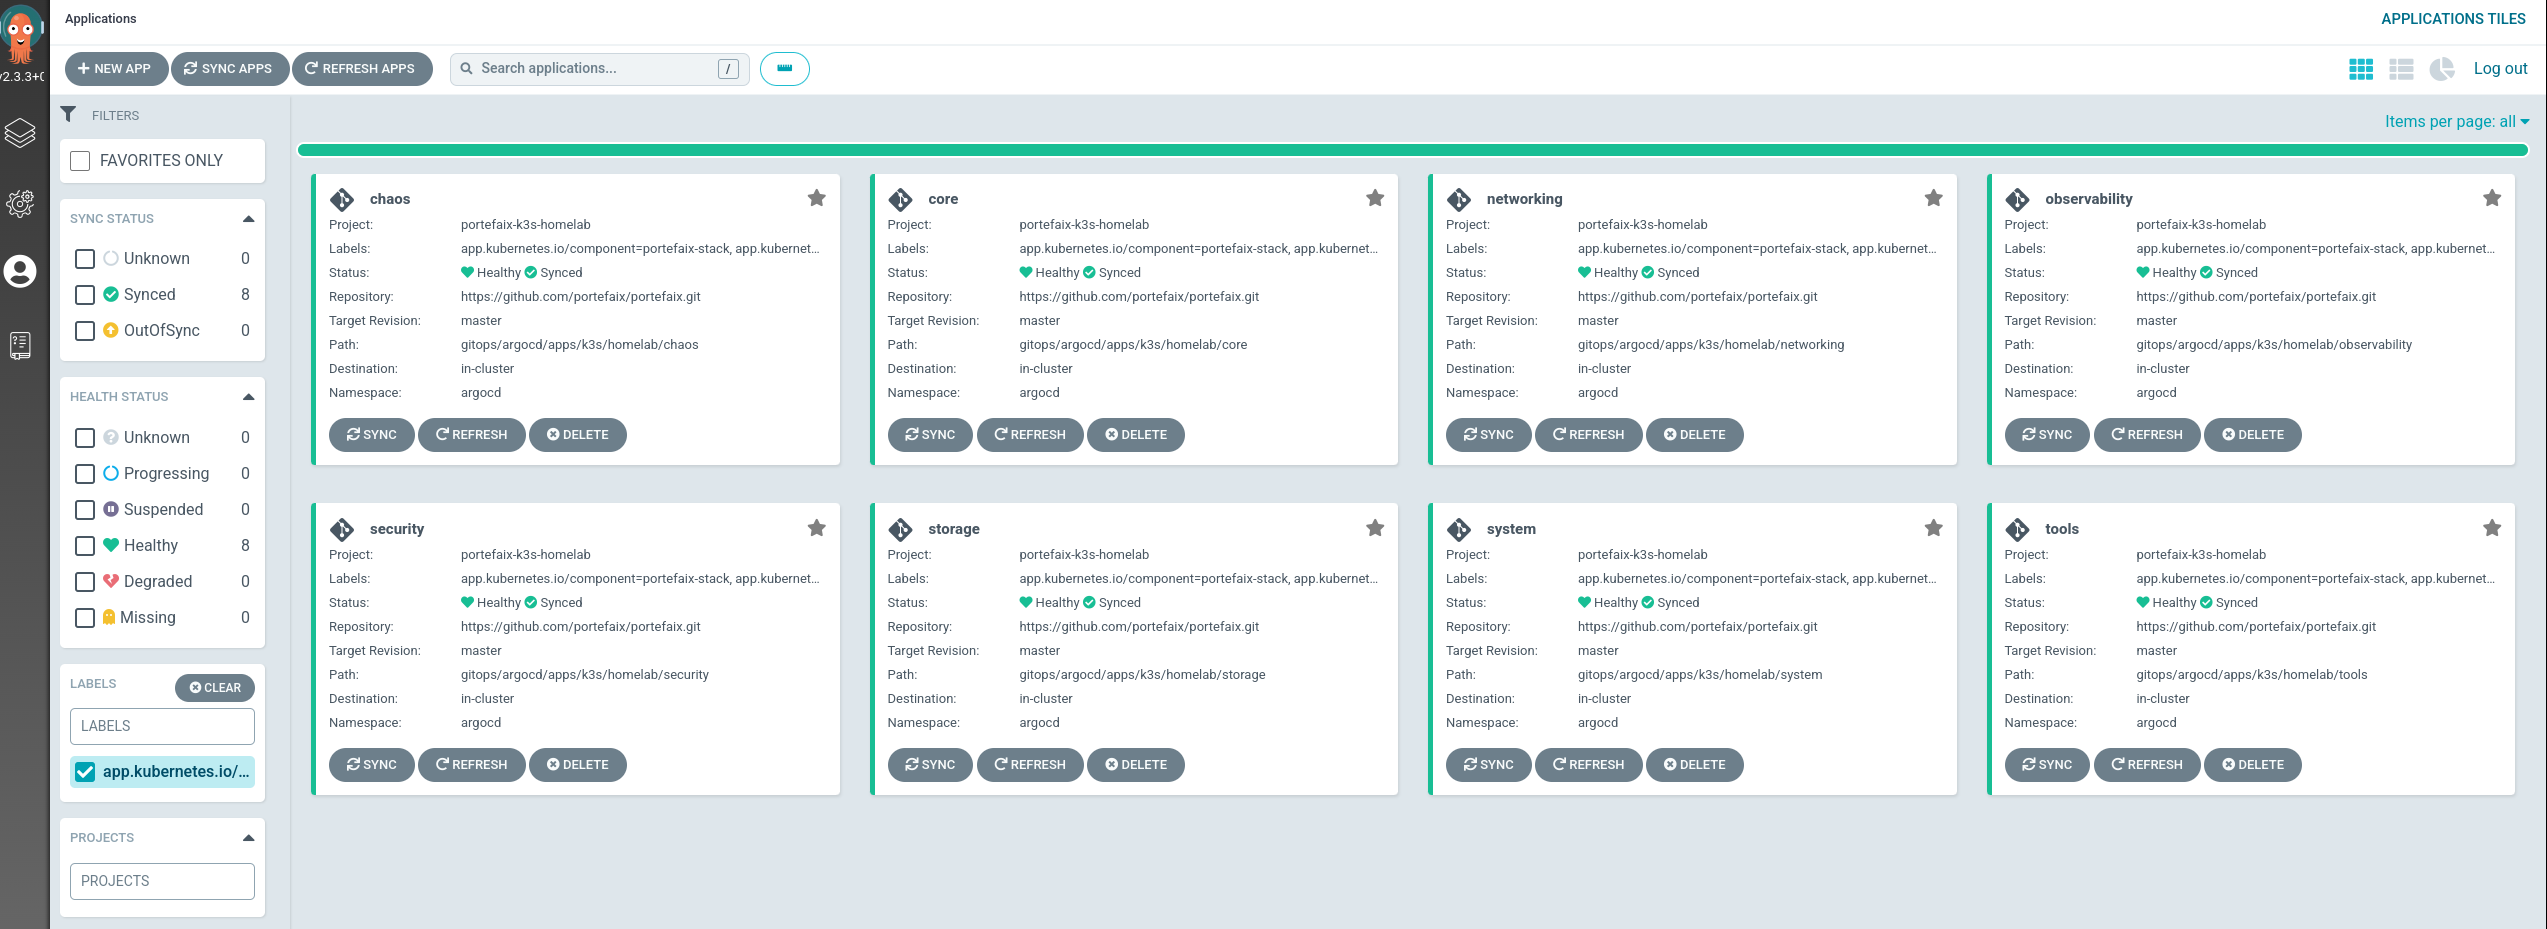
You can list stack installed:
❯ helm list -A
NAME    NAMESPACE       REVISION        UPDATED                                         STATUS          CHART           APP VERSION
argo-cd argocd          1               2022-06-08 07:40:20.039787662 +0200 CEST        deployed        argo-cd-1.0.0   4.5.0
core    argocd          1               2022-06-08 07:42:03.285558277 +0200 CEST        deployed        stack-0.1.0     0.1.0
system  argocd          1               2022-06-08 07:41:21.749647011 +0200 CEST        deployed        stack-0.1.0     0.1.0
Argo-CD applications installs others Argo-CD applications:
Go to Argo-CD dashboard, you will see Argo-CD corresponding applications.
You can list Stack applications using the labels app.kubernetes.io/component: portefaix-stack
2.3 - FluxCD
Organization
Manifests files :
kubernetes/basedirectory contains manifests for all componentskubernetes/overlays/**directory contains Kustomize overlays
Flux components are deployed for each cluster on clusters/<CLOUD>/<ENV>/ :
clusters/<CLOUD>/<ENV>/flux-system: Flux core componentsclusters/<CLOUD>/<ENV>/*.yaml: Flux Kustomization files for components
Bootstrap
FluxCD
❯ make bootstrap-fluxcd ENV=<environment> CLOUD=<cloud provider> BRANCH=<git branch to use>
Stacks
You can list stack installed:
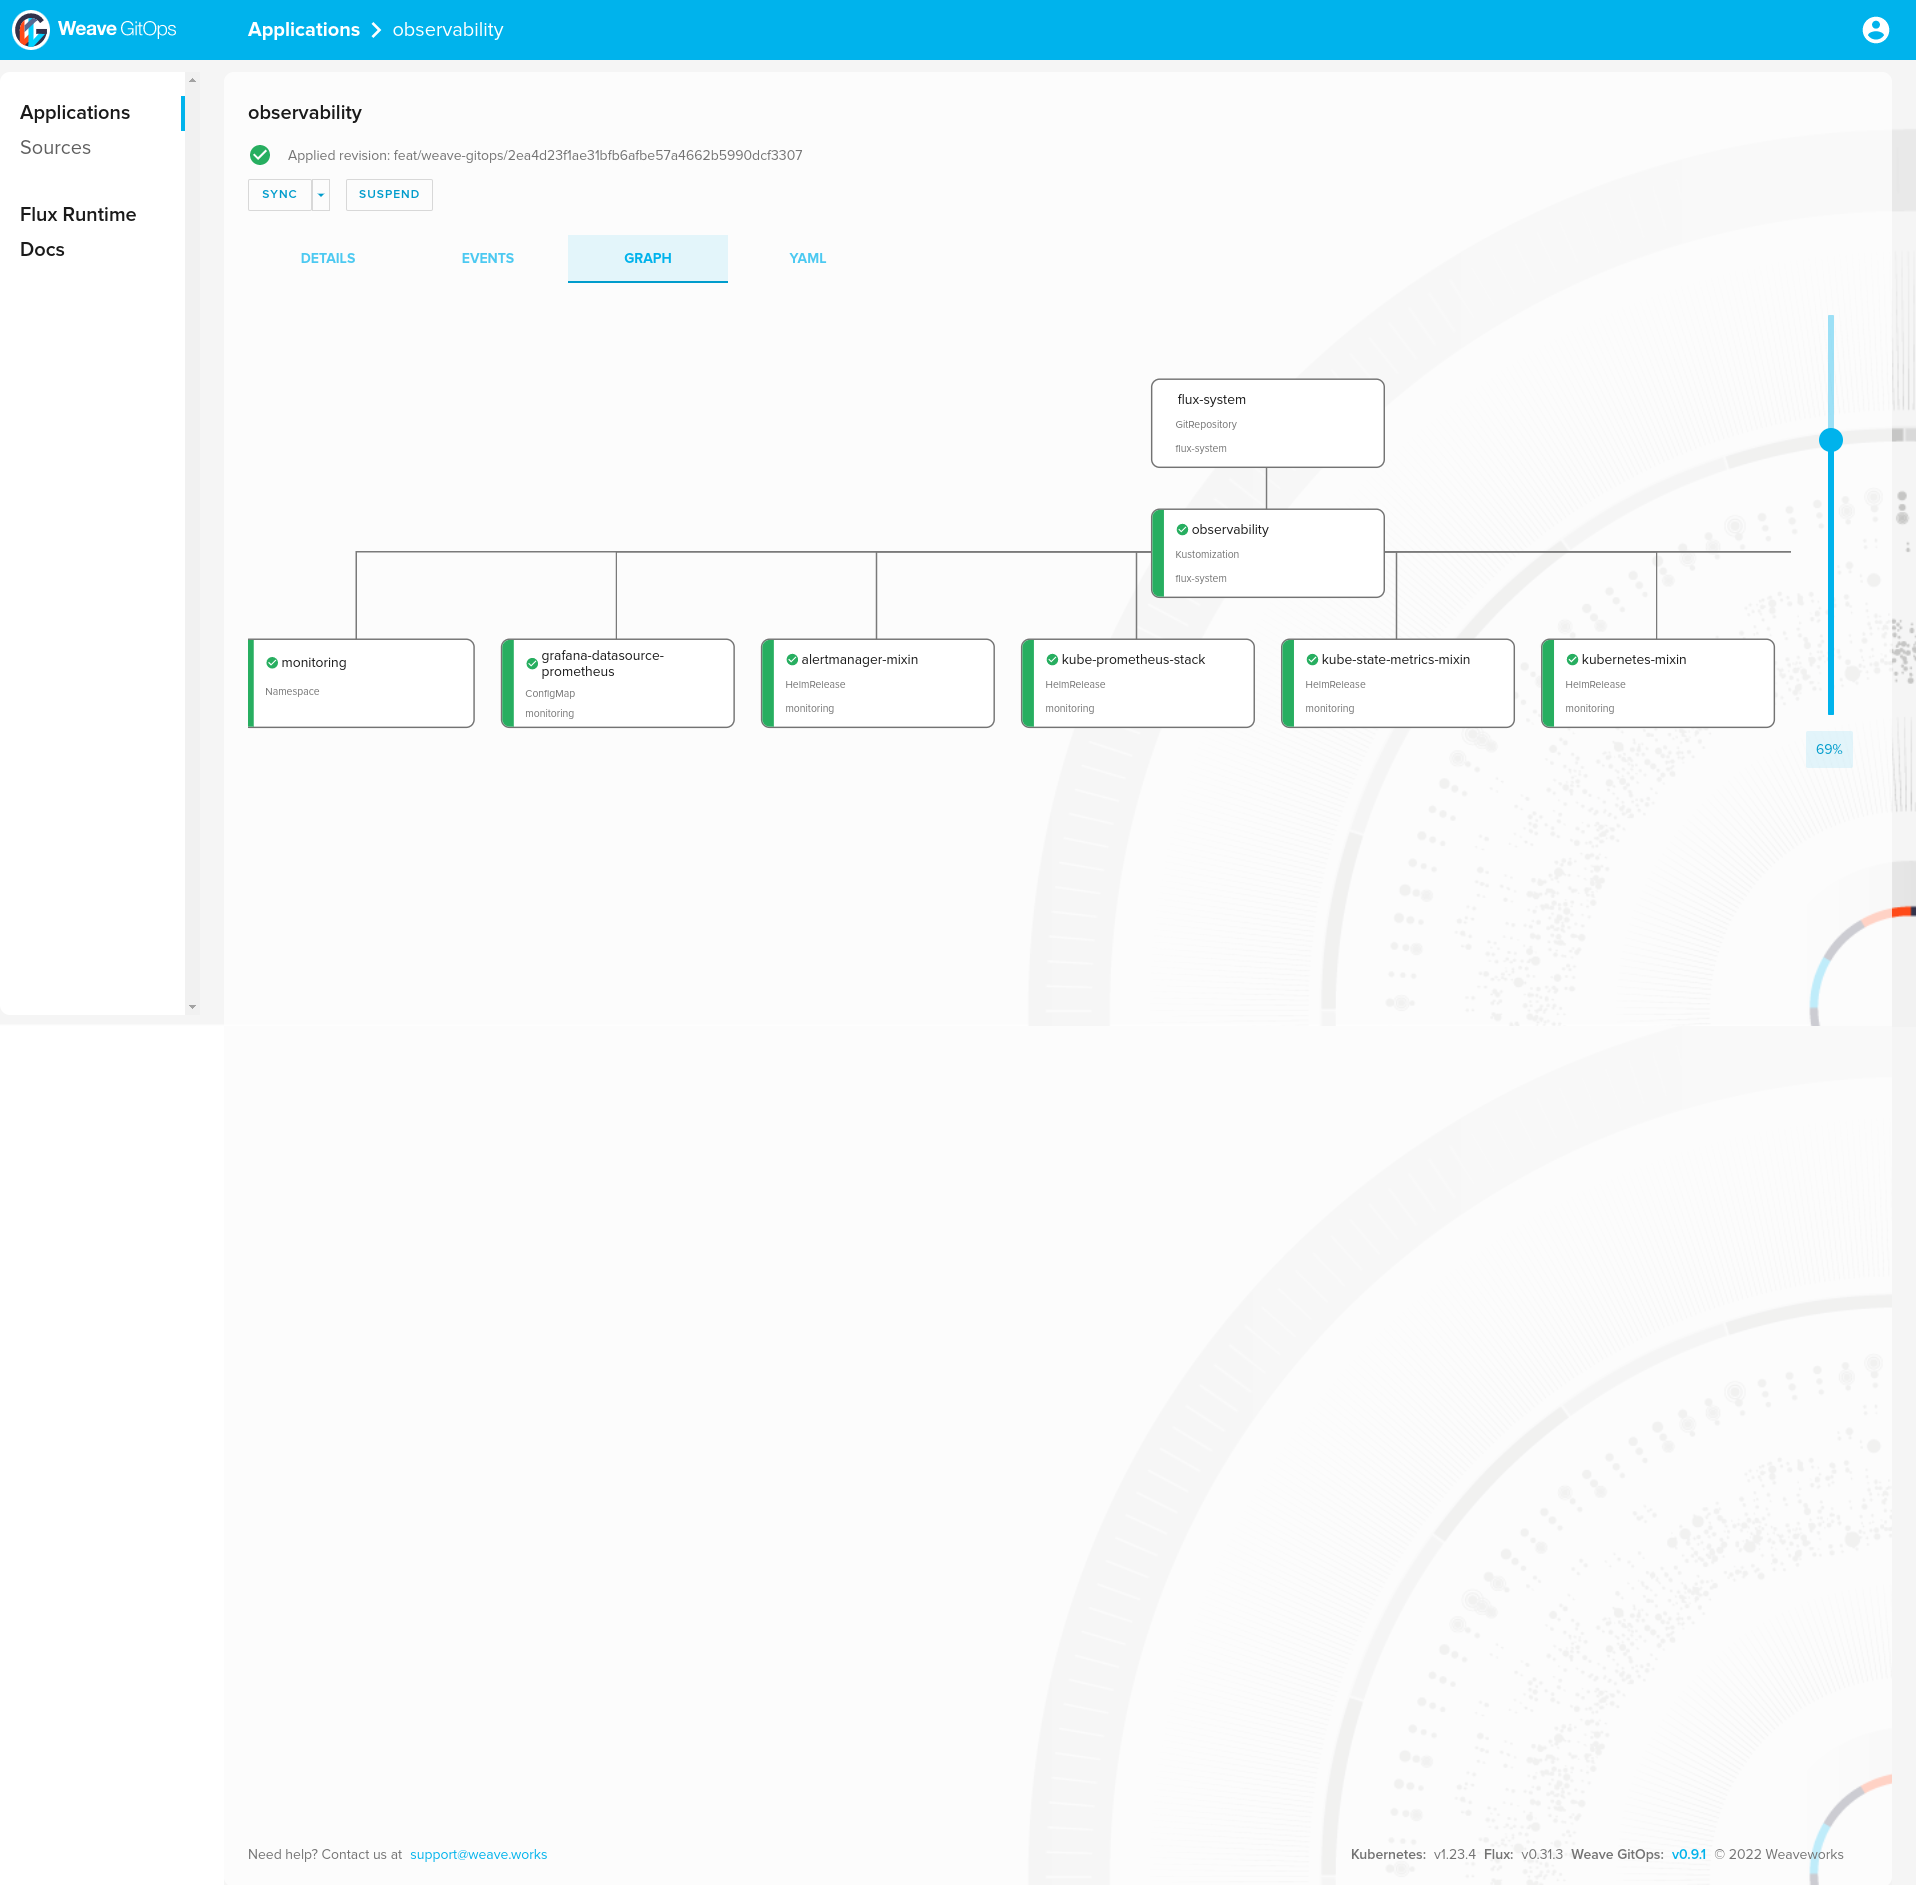
❯ kubectl -n flux-system get kustomization -l "app.kubernetes.io/component=portefaix-stack"
NAME AGE READY STATUS
core 107m True Applied revision: feat/weave-gitops/2ea4d23f1ae31bfb6afbe57a4662b5990dcf3307
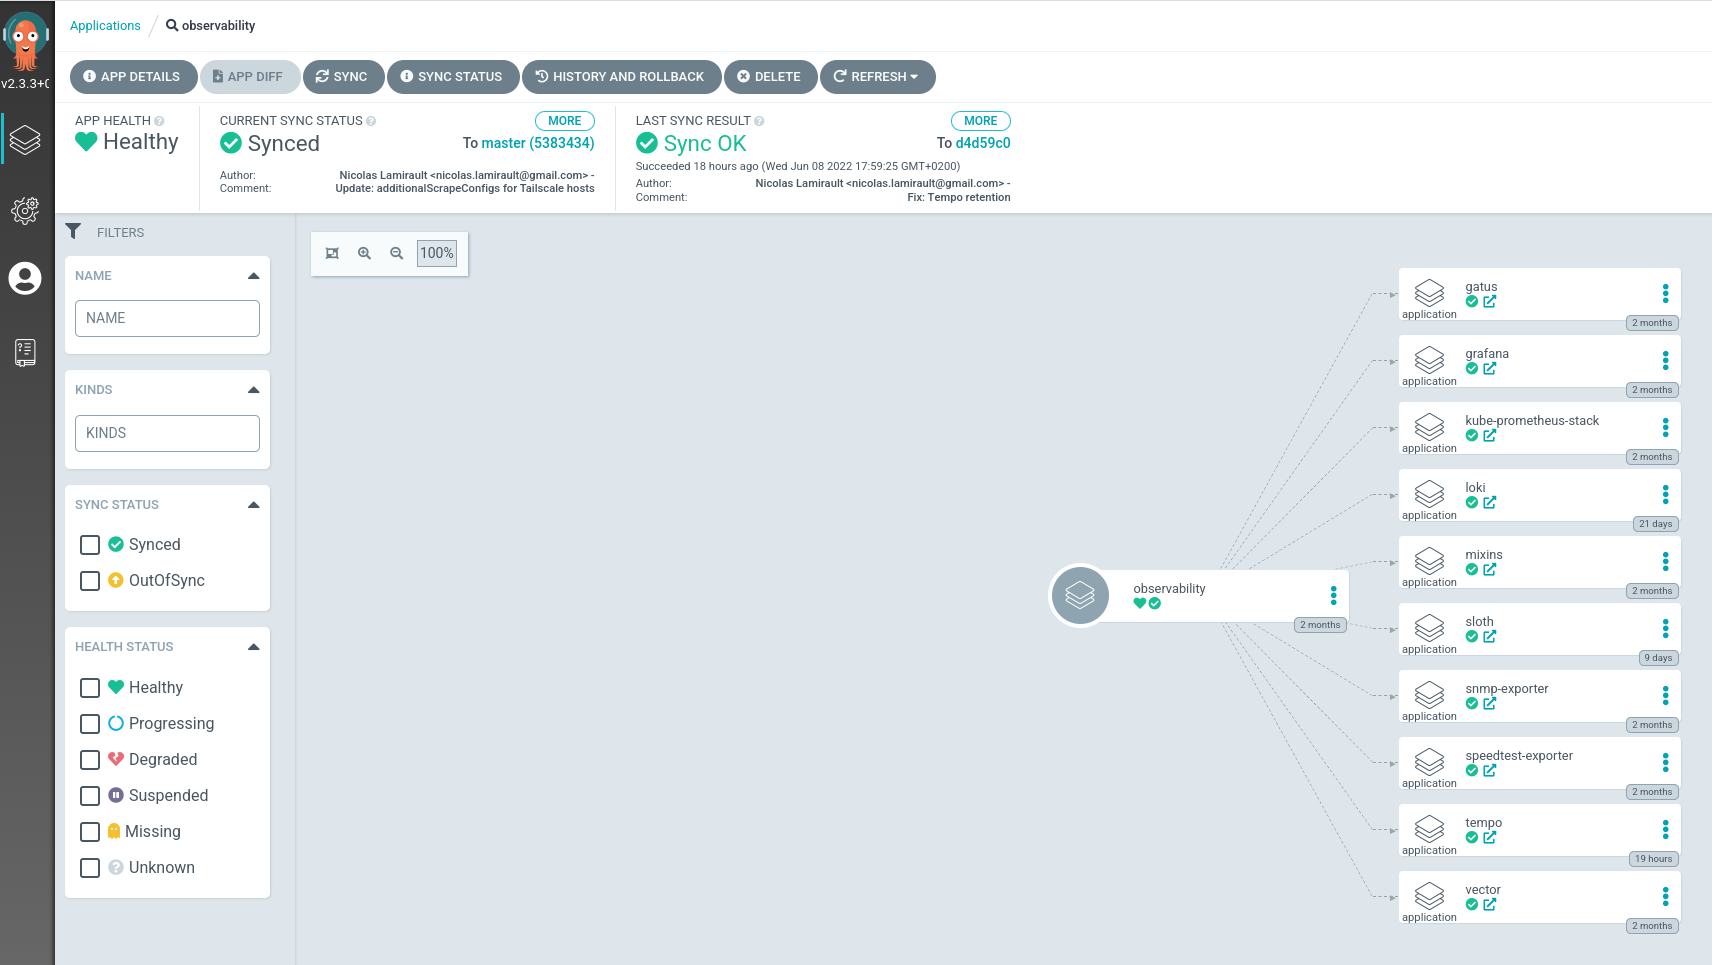
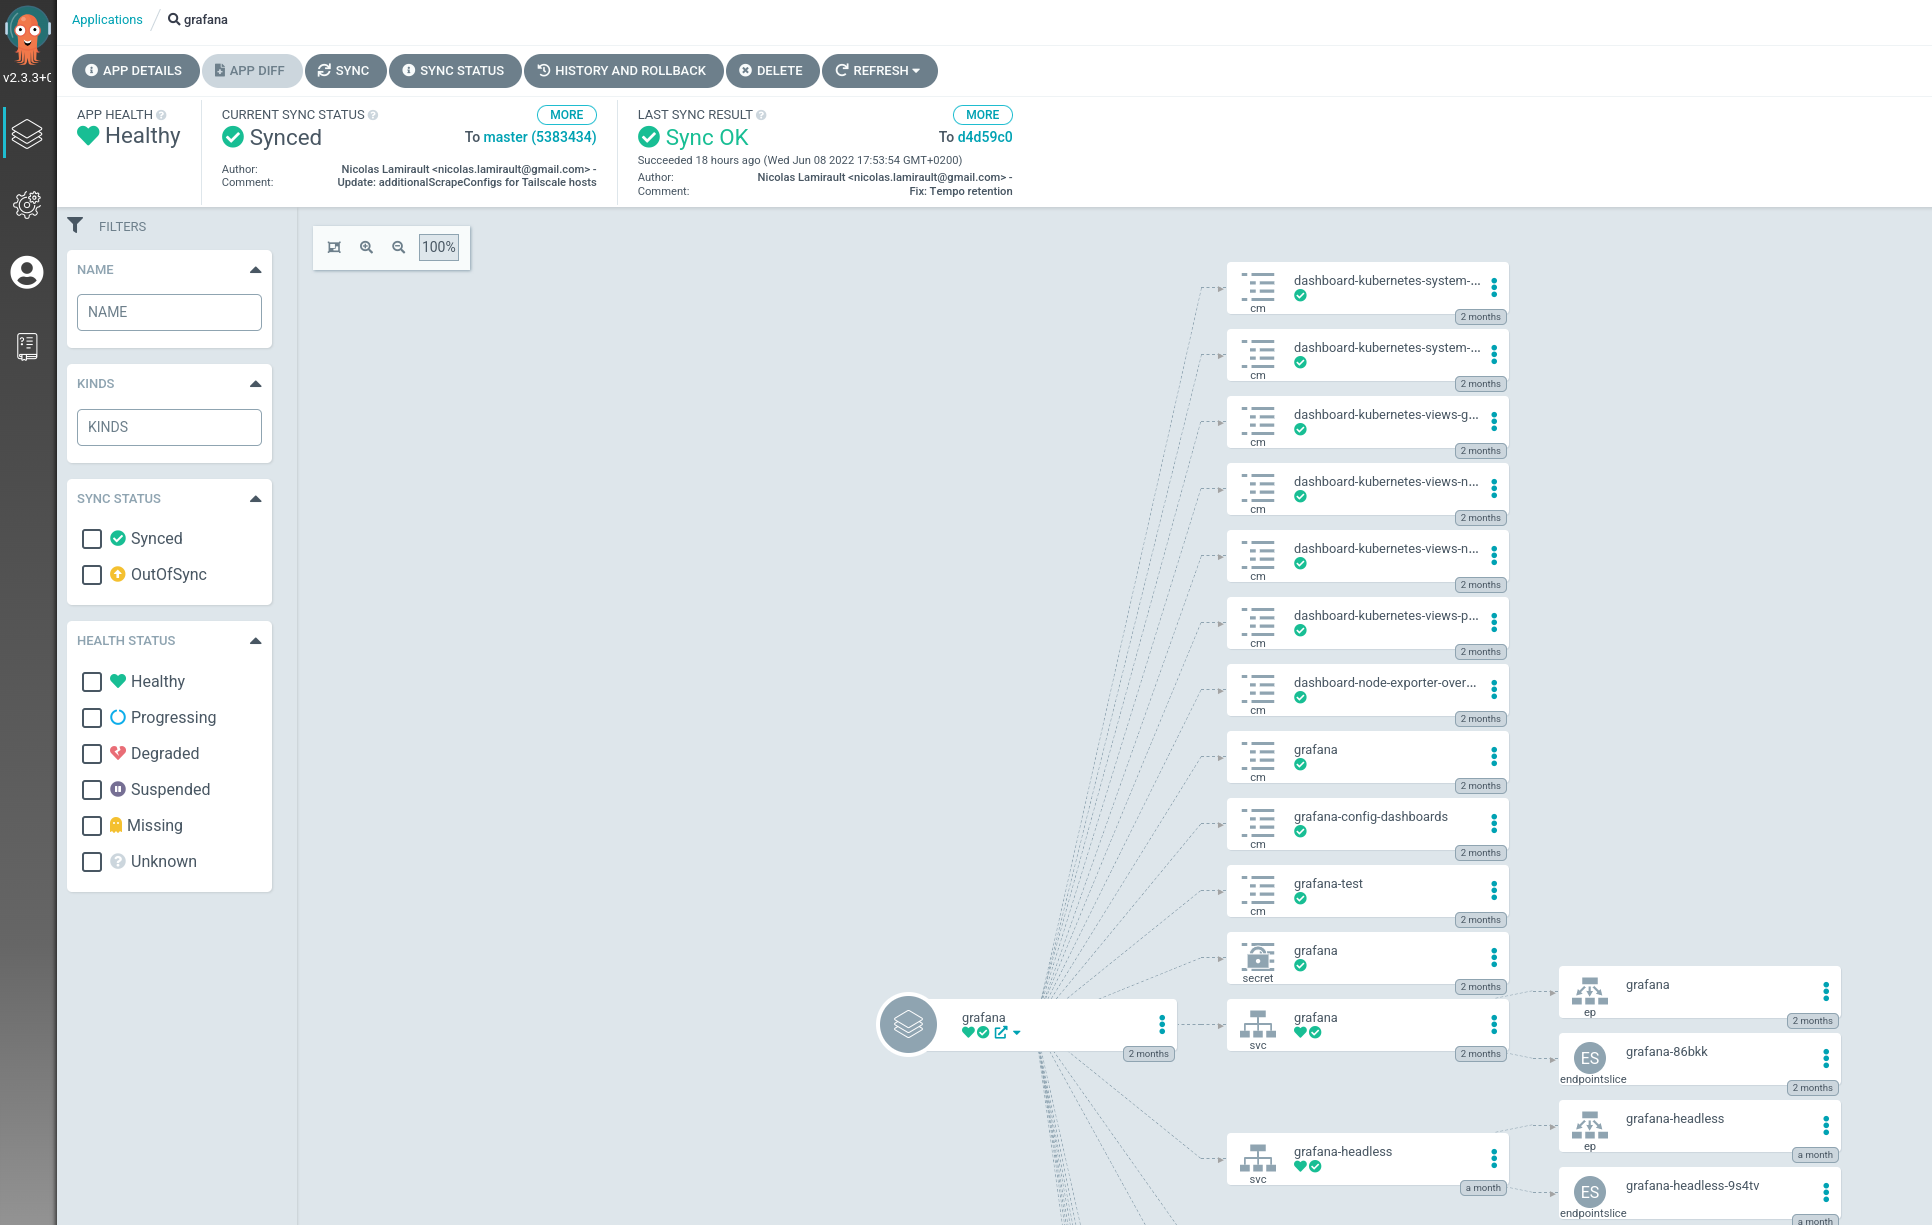
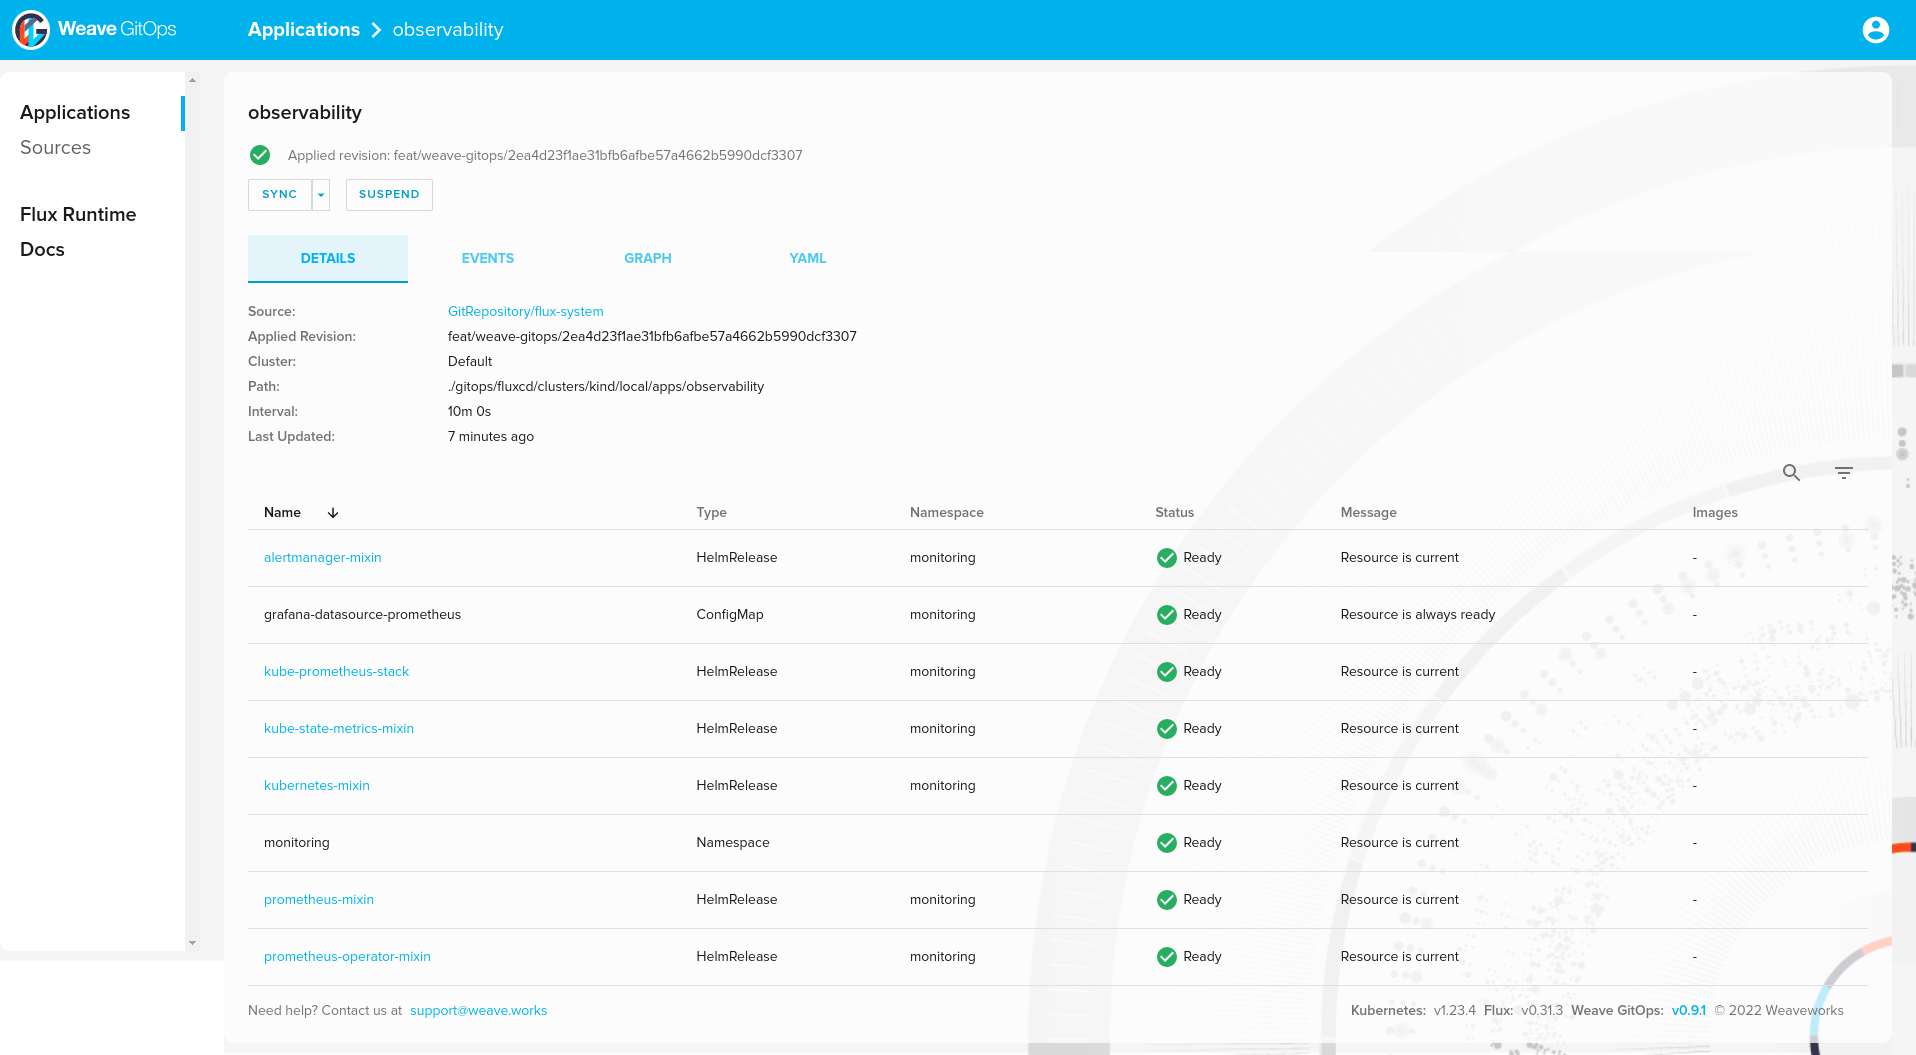
observability 109m True Applied revision: feat/weave-gitops/2ea4d23f1ae31bfb6afbe57a4662b5990dcf3307
And Helm releases:
❯ helm list -A
NAME                            NAMESPACE       REVISION        UPDATED                                 STATUS          CHART                           APP VERSION
alertmanager-mixin              monitoring      1               2022-08-08 10:57:51.540267795 +0000 UTC deployed        alertmanager-mixin-0.6.0        0.23.0
kube-prometheus-stack           monitoring      1               2022-08-08 10:57:52.701498295 +0000 UTC deployed        kube-prometheus-stack-35.0.3    0.56.0
kube-state-metrics-mixin        monitoring      1               2022-08-08 10:57:52.285323133 +0000 UTC deployed        kube-state-metrics-mixin-0.10.0 2.2.4
kubernetes-mixin                monitoring      1               2022-08-08 10:57:52.528376605 +0000 UTC deployed        kubernetes-mixin-0.8.0          0.8.0
kyverno                         flux-system     1               2022-08-08 09:00:31.649605165 +0000 UTC deployed        kyverno-crds-v2.0.3             v1.4.3
metrics-server                  kube-system     1               2022-08-08 10:57:41.851963826 +0000 UTC failed          metrics-server-3.8.2            0.6.1
prometheus-mixin                monitoring      1               2022-08-08 10:57:53.019370201 +0000 UTC deployed        prometheus-mixin-0.10.0         2.31.1
prometheus-operator-mixin       monitoring      1               2022-08-08 10:57:53.815678548 +0000 UTC deployed        prometheus-operator-mixin-0.8.0 0.52.1
weawe-gitops                    flux-system     1               2022-08-08 07:49:32.97390968 +0000 UTC  deployed        weave-gitops-2.2.5              v0.9.1

Secrets
File
Create a Kubernetes secret file from sensitive file.
Ex: for Thanos configuration :
❯ cat .secrets/aws/object-store.yaml
type: S3
config:
  bucket: xxxxxxxxxxx
  endpoint: s3.eu-west-3.amazonaws.com
  region: eu-west-3
❯ make kubernetes-secret NAME=thanos-object-storage NAMESPACE=monitoring FILE=.secrets/aws/object-store.yaml > thanos-object-storage.yaml
Encrypt
Encrypt the file using Sops:
❯ make sops-encrypt ENV=staging CLOUD=aws FILE=thanos-object-storage.yaml
You can now safely store this file into Git.
❯ mv thanos-object-storage.yaml kubernetes/overlays/staging/monitoring/thanos/
Decrypt
Check you can decrypt the file:
❯ make sops-decrypt FILE=kubernetes/overlays/staging/monitoring/thanos/thanos-object-storage.yaml
apiVersion: v1
data:
    object-store.yaml: xxxxxxxxxxx
kind: Secret
metadata:
    creationTimestamp: null
    name: thanos-object-storage
    namespace: monitoring
CI/CD
AGE
Work In Progress
PGP
Generate a GPG key with OpenPGP without specifying a passphrase:
❯ gpg --full-generate-key

Real name: nlamirault
Email address: nlamirault@users.noreply.github.com
Comment:
You selected this USER-ID:
    "nlamirault <nlamirault@users.noreply.github.com>"

Change (N)ame, (C)omment, (E)mail or (O)kay/(Q)uit? O
Retrieve the GPG key ID:
❯ gpg --export-secret-keys \
--armor FC5BB3323309486AC8DA477CEC6421C7C33D2301
Add this output into a Github Secret SOPS_GPG_KEY.
On the e2e Github Action workflow, we create a Kubernetes secret sops-gpg
which will be used by Flux.